Food from video games
Video game streamer That Lucky Bear and I recently collaborated on a stream project involving food from video games. I told him I would pick six games, make a dish from each, and serve them to him live on stream. He did not know what I was making ahead of time.
You can watch a full replay of That Lucky Bear eating all six courses below.
The Dishes
Many of the dishes below are first time attempts so I’m including the recipe/method I devised for stream day, plus several links back to other resources I used for research. I strongly encourage you to browse other sources before attempting any of these for the first time.
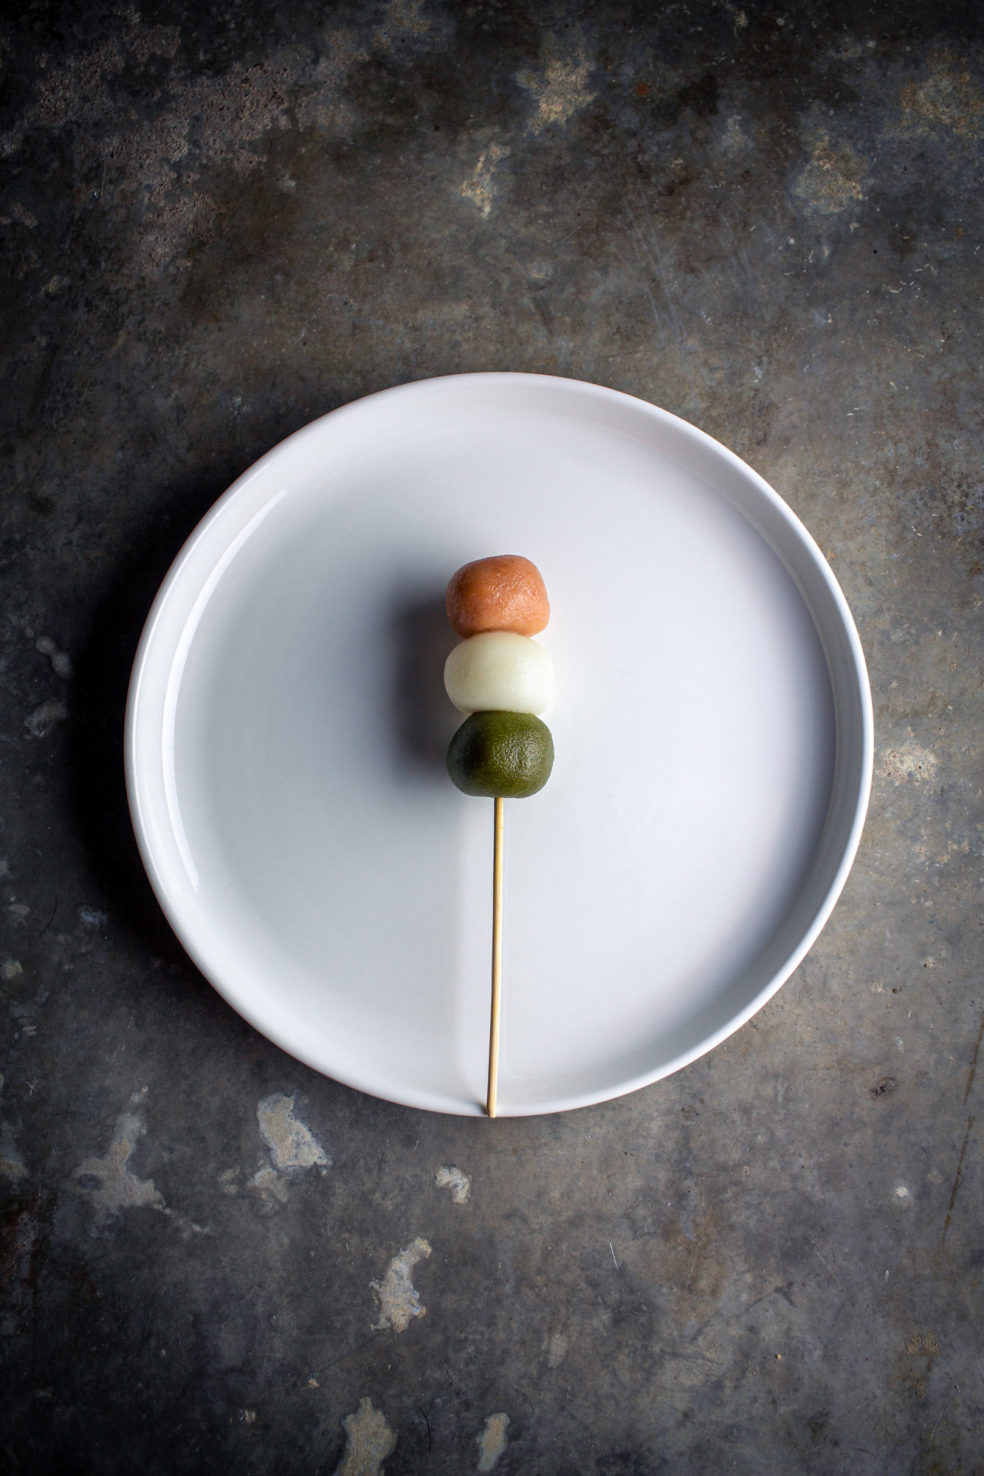
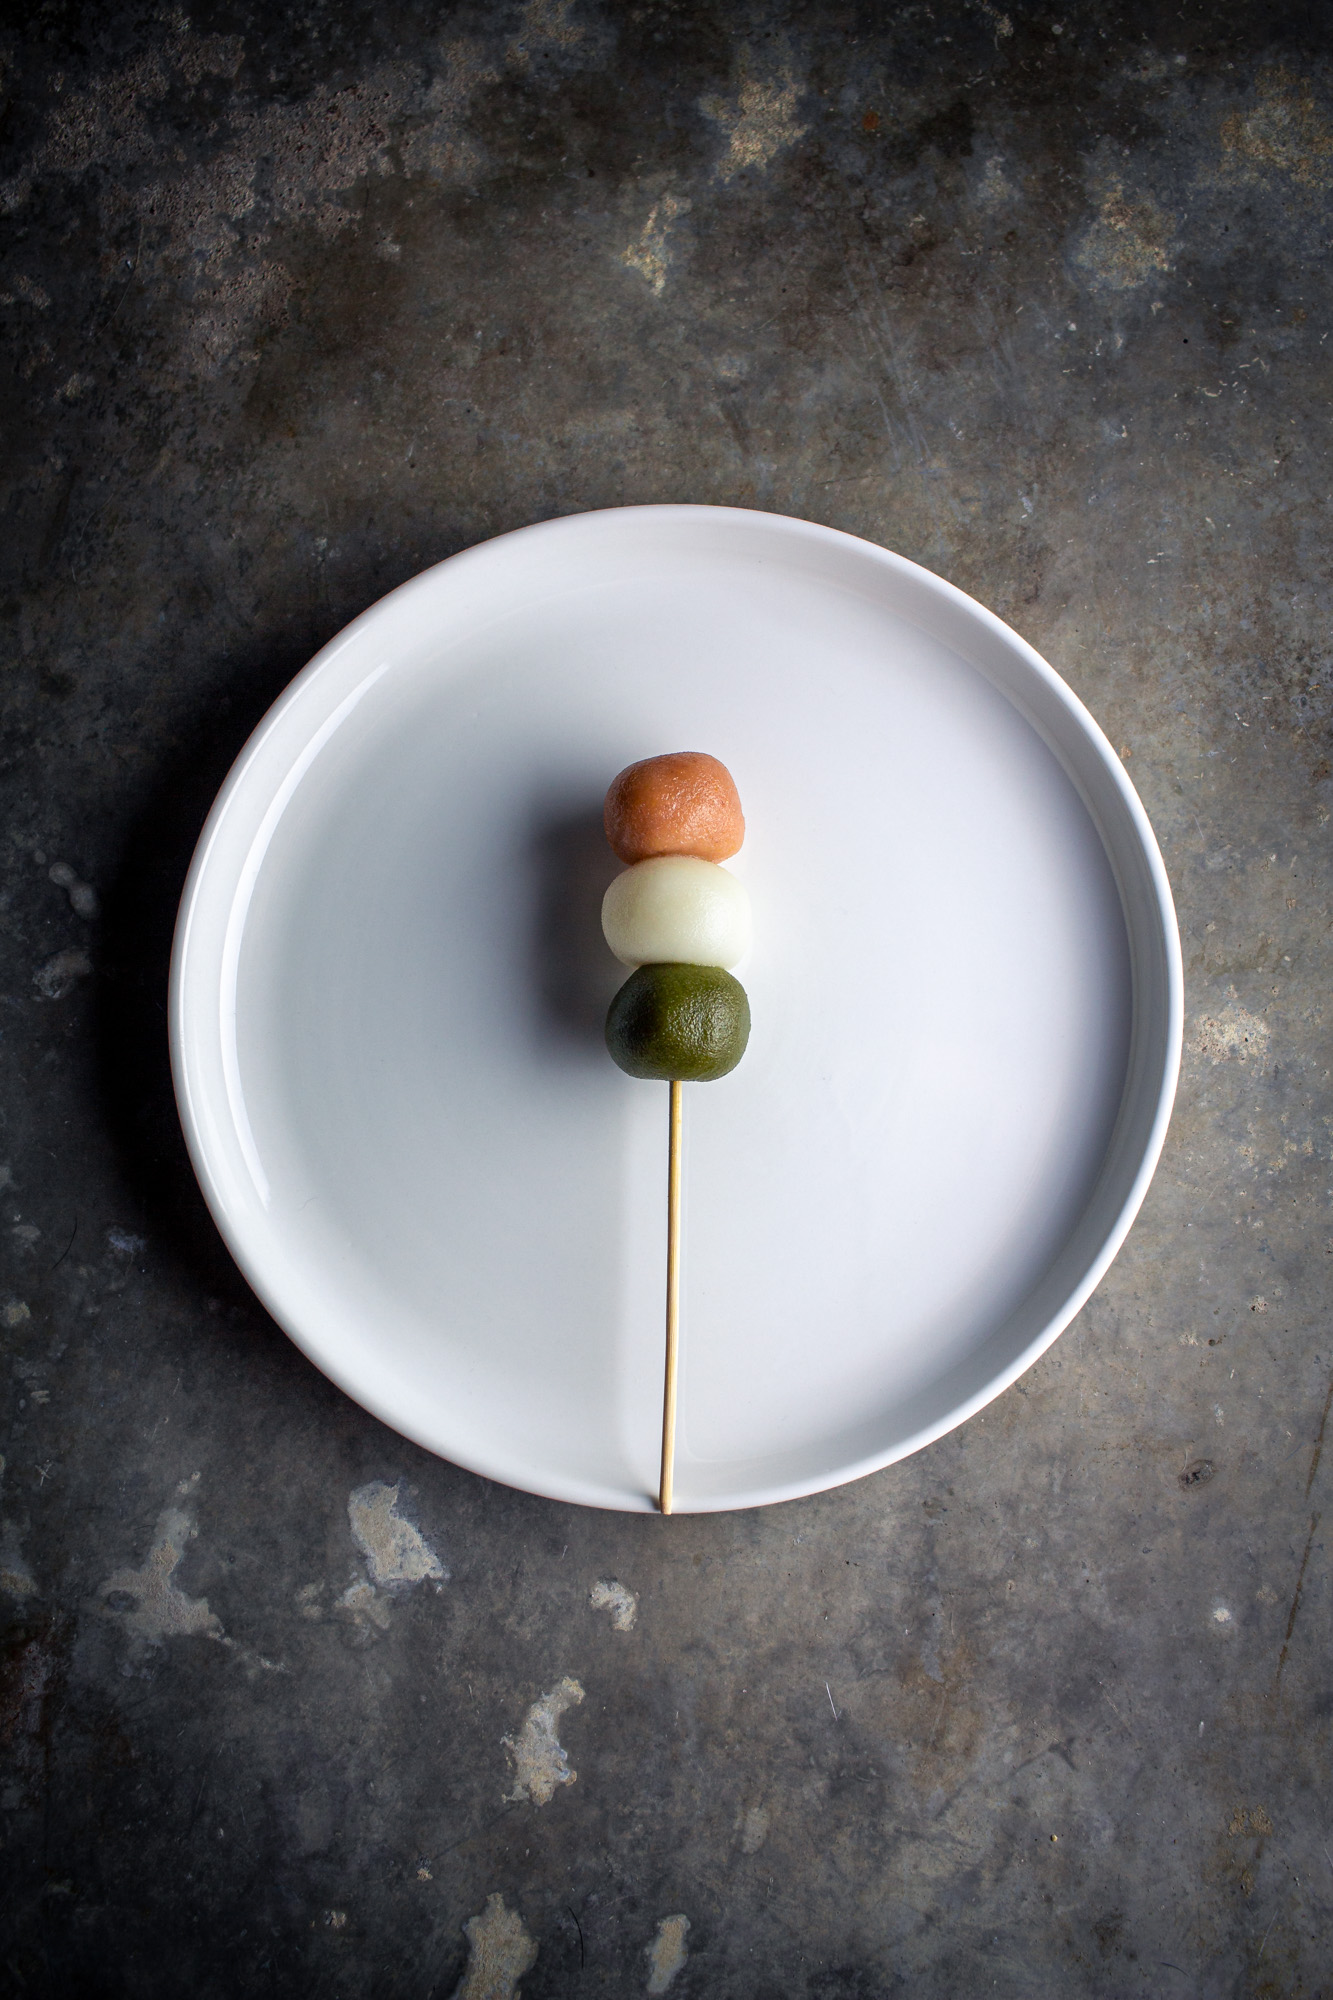
Course 1: Dango
Monster Hunter Rise
Course 2: Meaty Rice Balls aka Beef Onigiri
Legend of Zelda Breath of the Wild
Course 3: Squid Ink Ravioli
Stardew Valley
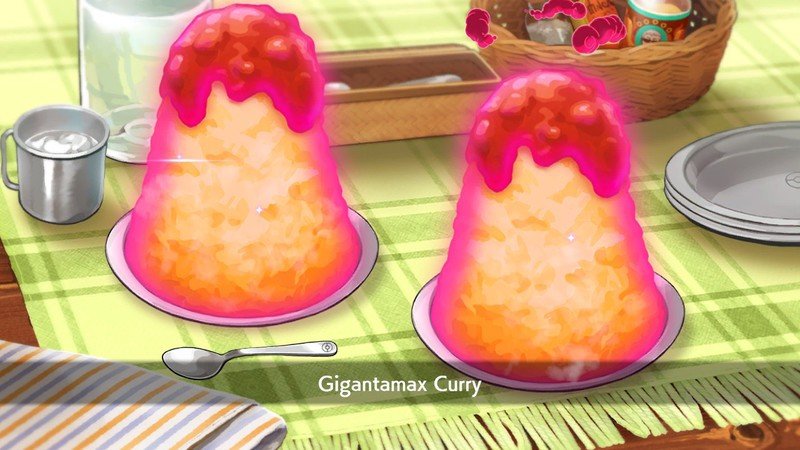
Course 5: Gigantamax Curry aka Japanese Style Beef and Apple Curry
Pokemon Sword and Shield
Course 6: Sohm Al Tart aka Mont Blanc Tart
Final Fantasy XIV
Dango
Monster Hunter Rise
Monster Hunter Rise
Ingredients
- ⅔ cup joshinko rice flour
- ⅔ cup shiratamako rice flour
- ¼ cup powdered sugar
- ⅔ cup warm water
- 1 tsp matcha powder
- 1 Tbsp peach or strawberry powder or 2 drops red/pink food coloring
Combine all dry ingredients in a bowl and slowly add warm water. Mix and knead until smooth and elastic. Divide into thirds and separate into three bowls. In one bowl, add the matcha powder and knead until combined. Add the peach/strawberry powder to the second bowl and knead. The third bowl stays white. Roll each mixture into teaspoon-sized balls. Heat a large pot of boiling water and cook the dango until they float. Immediately transfer to an ice water bath, then make skewers, one of each dango color. Start with green, then white, and pink on top. Serve at room temperature.
Recipe Notes
Dango are Japanese rice dumplings, which are similar to (but not the same as) mochi. This recipe makes a version of dango called hanami dango. Hanami dango are eaten during the springtime, and the colors refer to the colors of a cherry blossom tree. Some sources say the pink and green dango have traditional Japanese flavorings that can be difficult to find in the US. I highly recommend checking out the source links below for more context and recipe information on dango. There are many different varieties and flavors to try as well. For my version of hanami dango, I wanted to try flavoring the red and green dango instead of using food coloring. To make peach or strawberry fruit powder, use freeze-dried fruit. Place the freeze-dried fruit in a blender and pulverize until finely milled. There are also fruit powders available to purchase online, but I prefer the freeze-dried fruit method because you know exactly what is in your powder.
In the game Monster Hunter Rise, your character can visit a canteen and choose from a variety of dango. Each type offers different perks or status effects. The dango in the game appear to be quite large and colorful, with many different flavors and textures. Many of the dango are topped with some kind of dark sauce, perhaps red bean paste?
If we were to apply the hanami dango recipe above to the in-game dango equivalent, perhaps we would have “Medicinal”, “Moongaze” and “Peach Skill” dango?
References
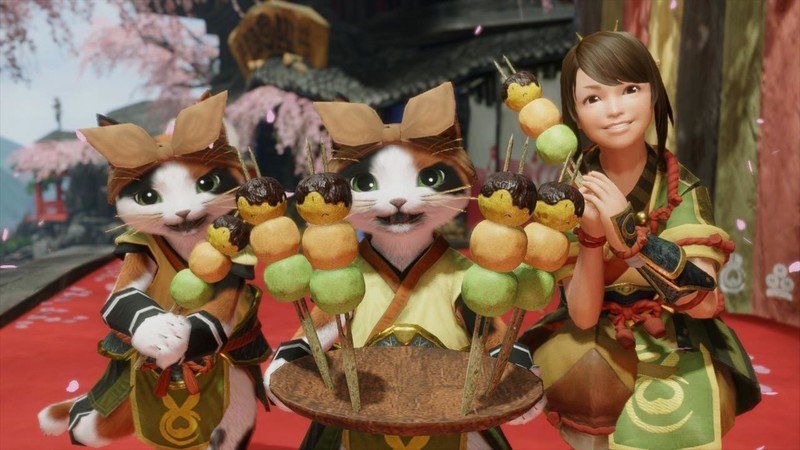
Dango from Monster Hunter Rise
Bunny Dango Trailer, Monster Hunter Rise
Hanami Dango, Just One Cookbook (Amazing Japanese recipe resource! Highly recommended!)
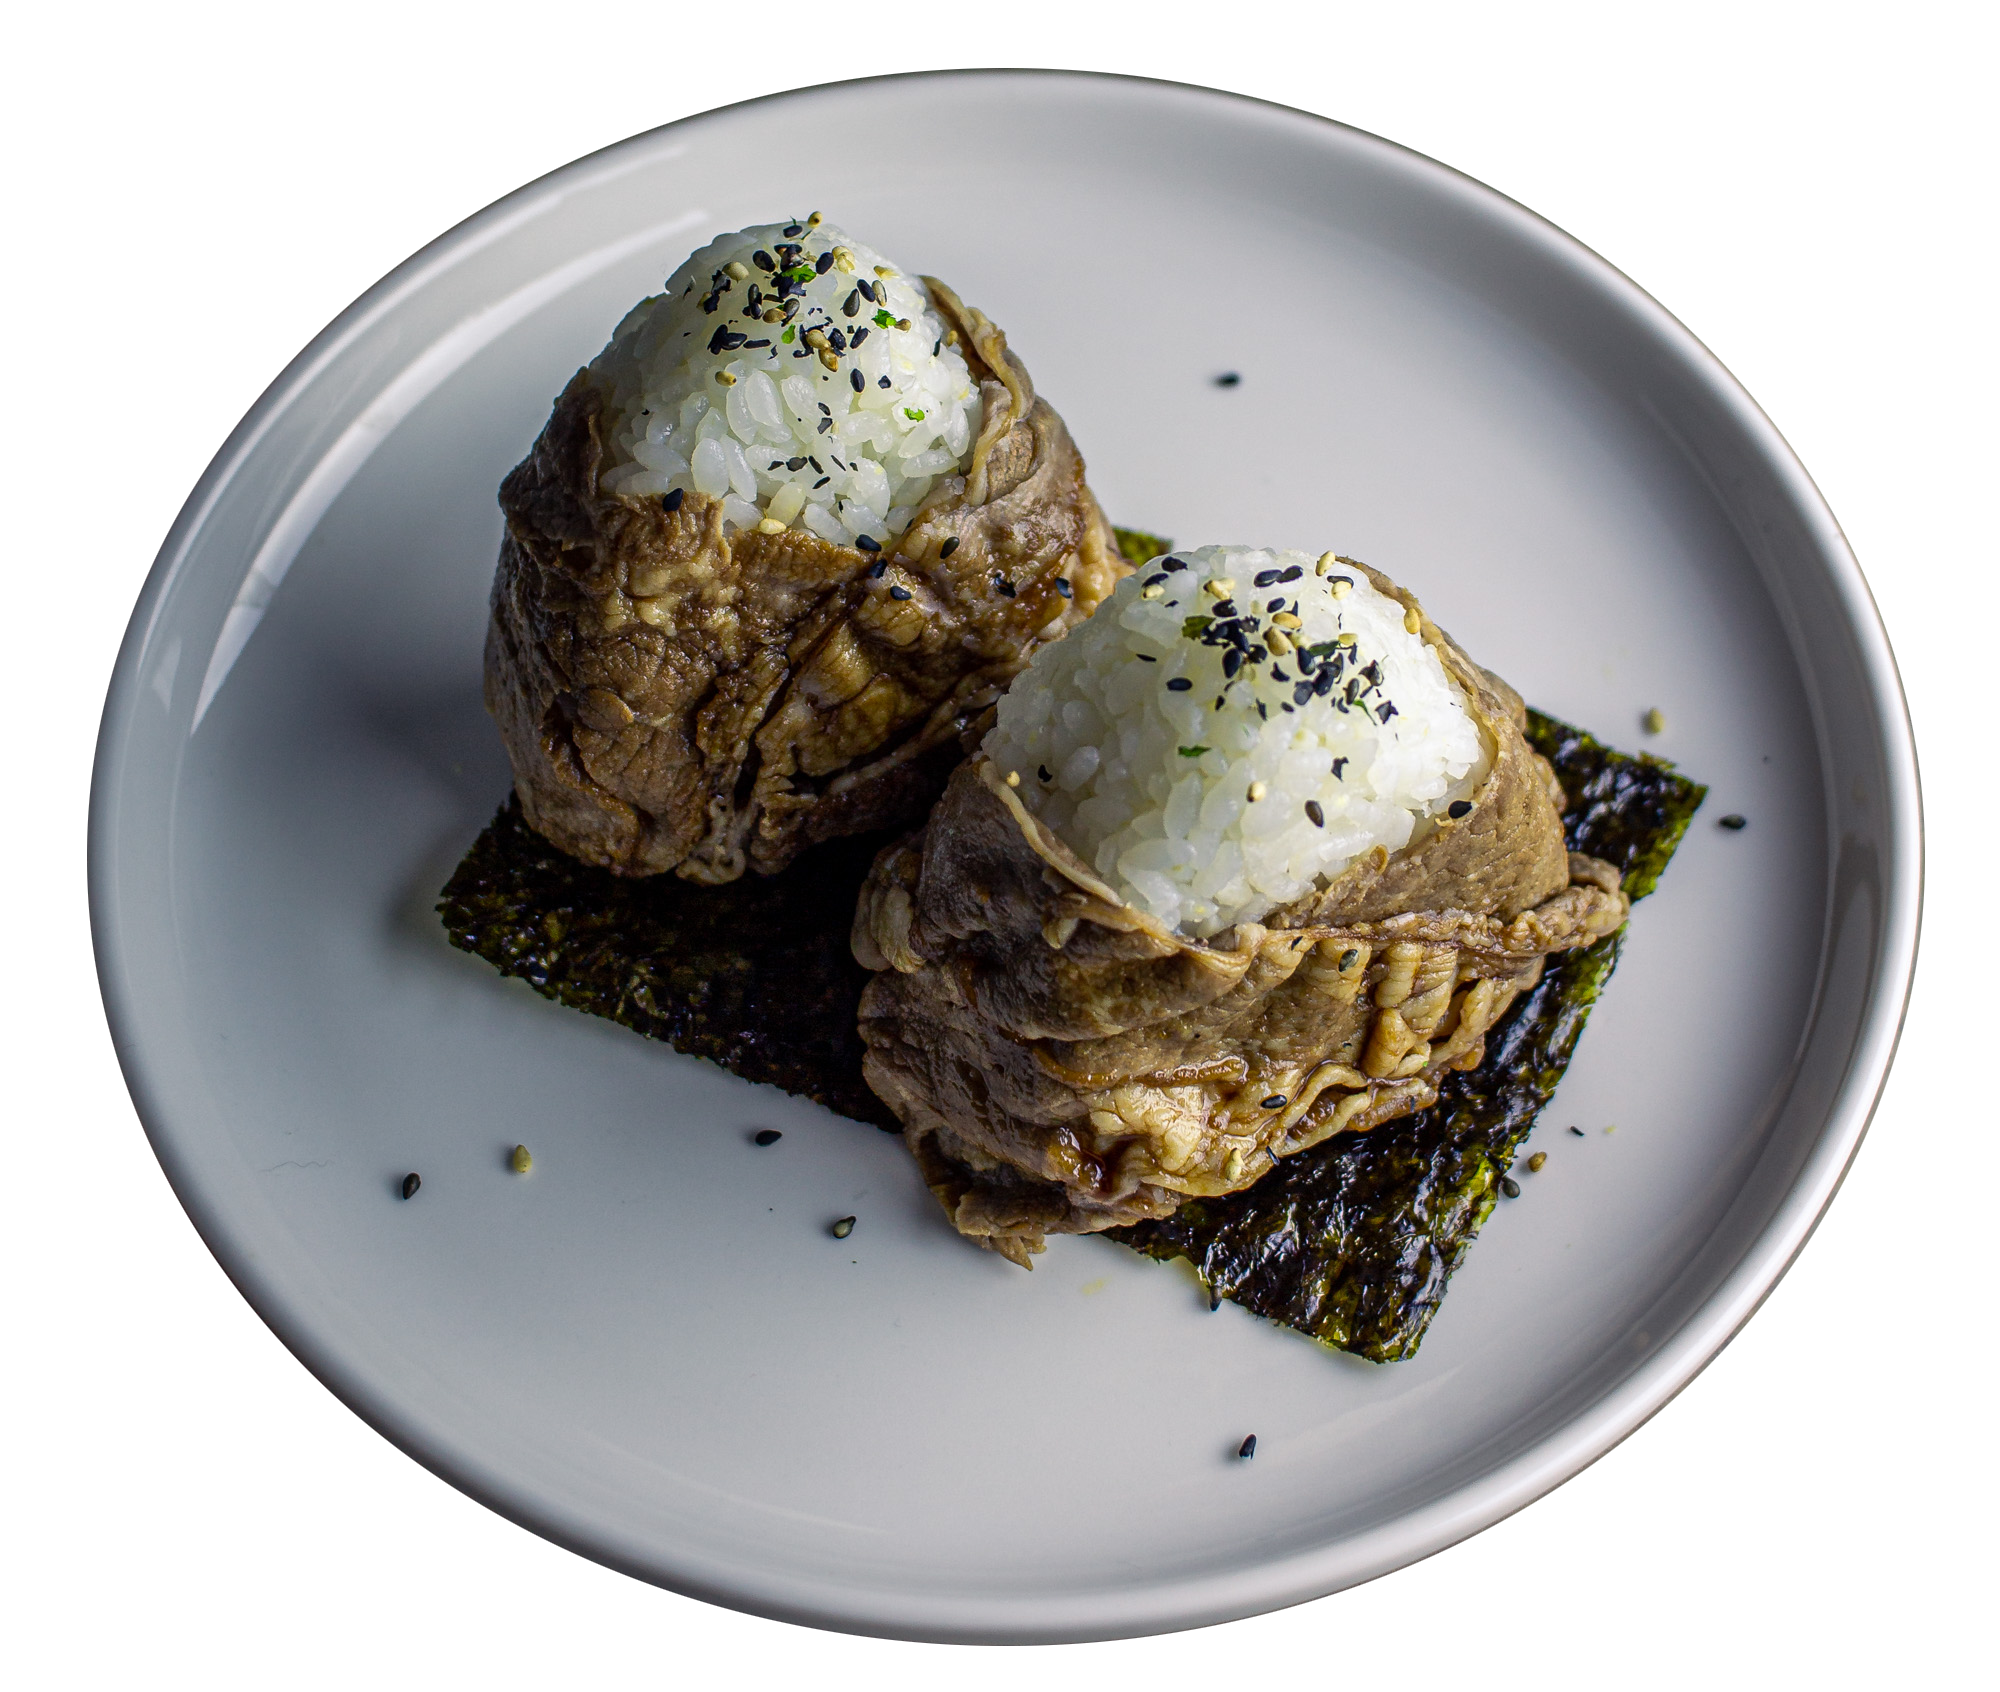
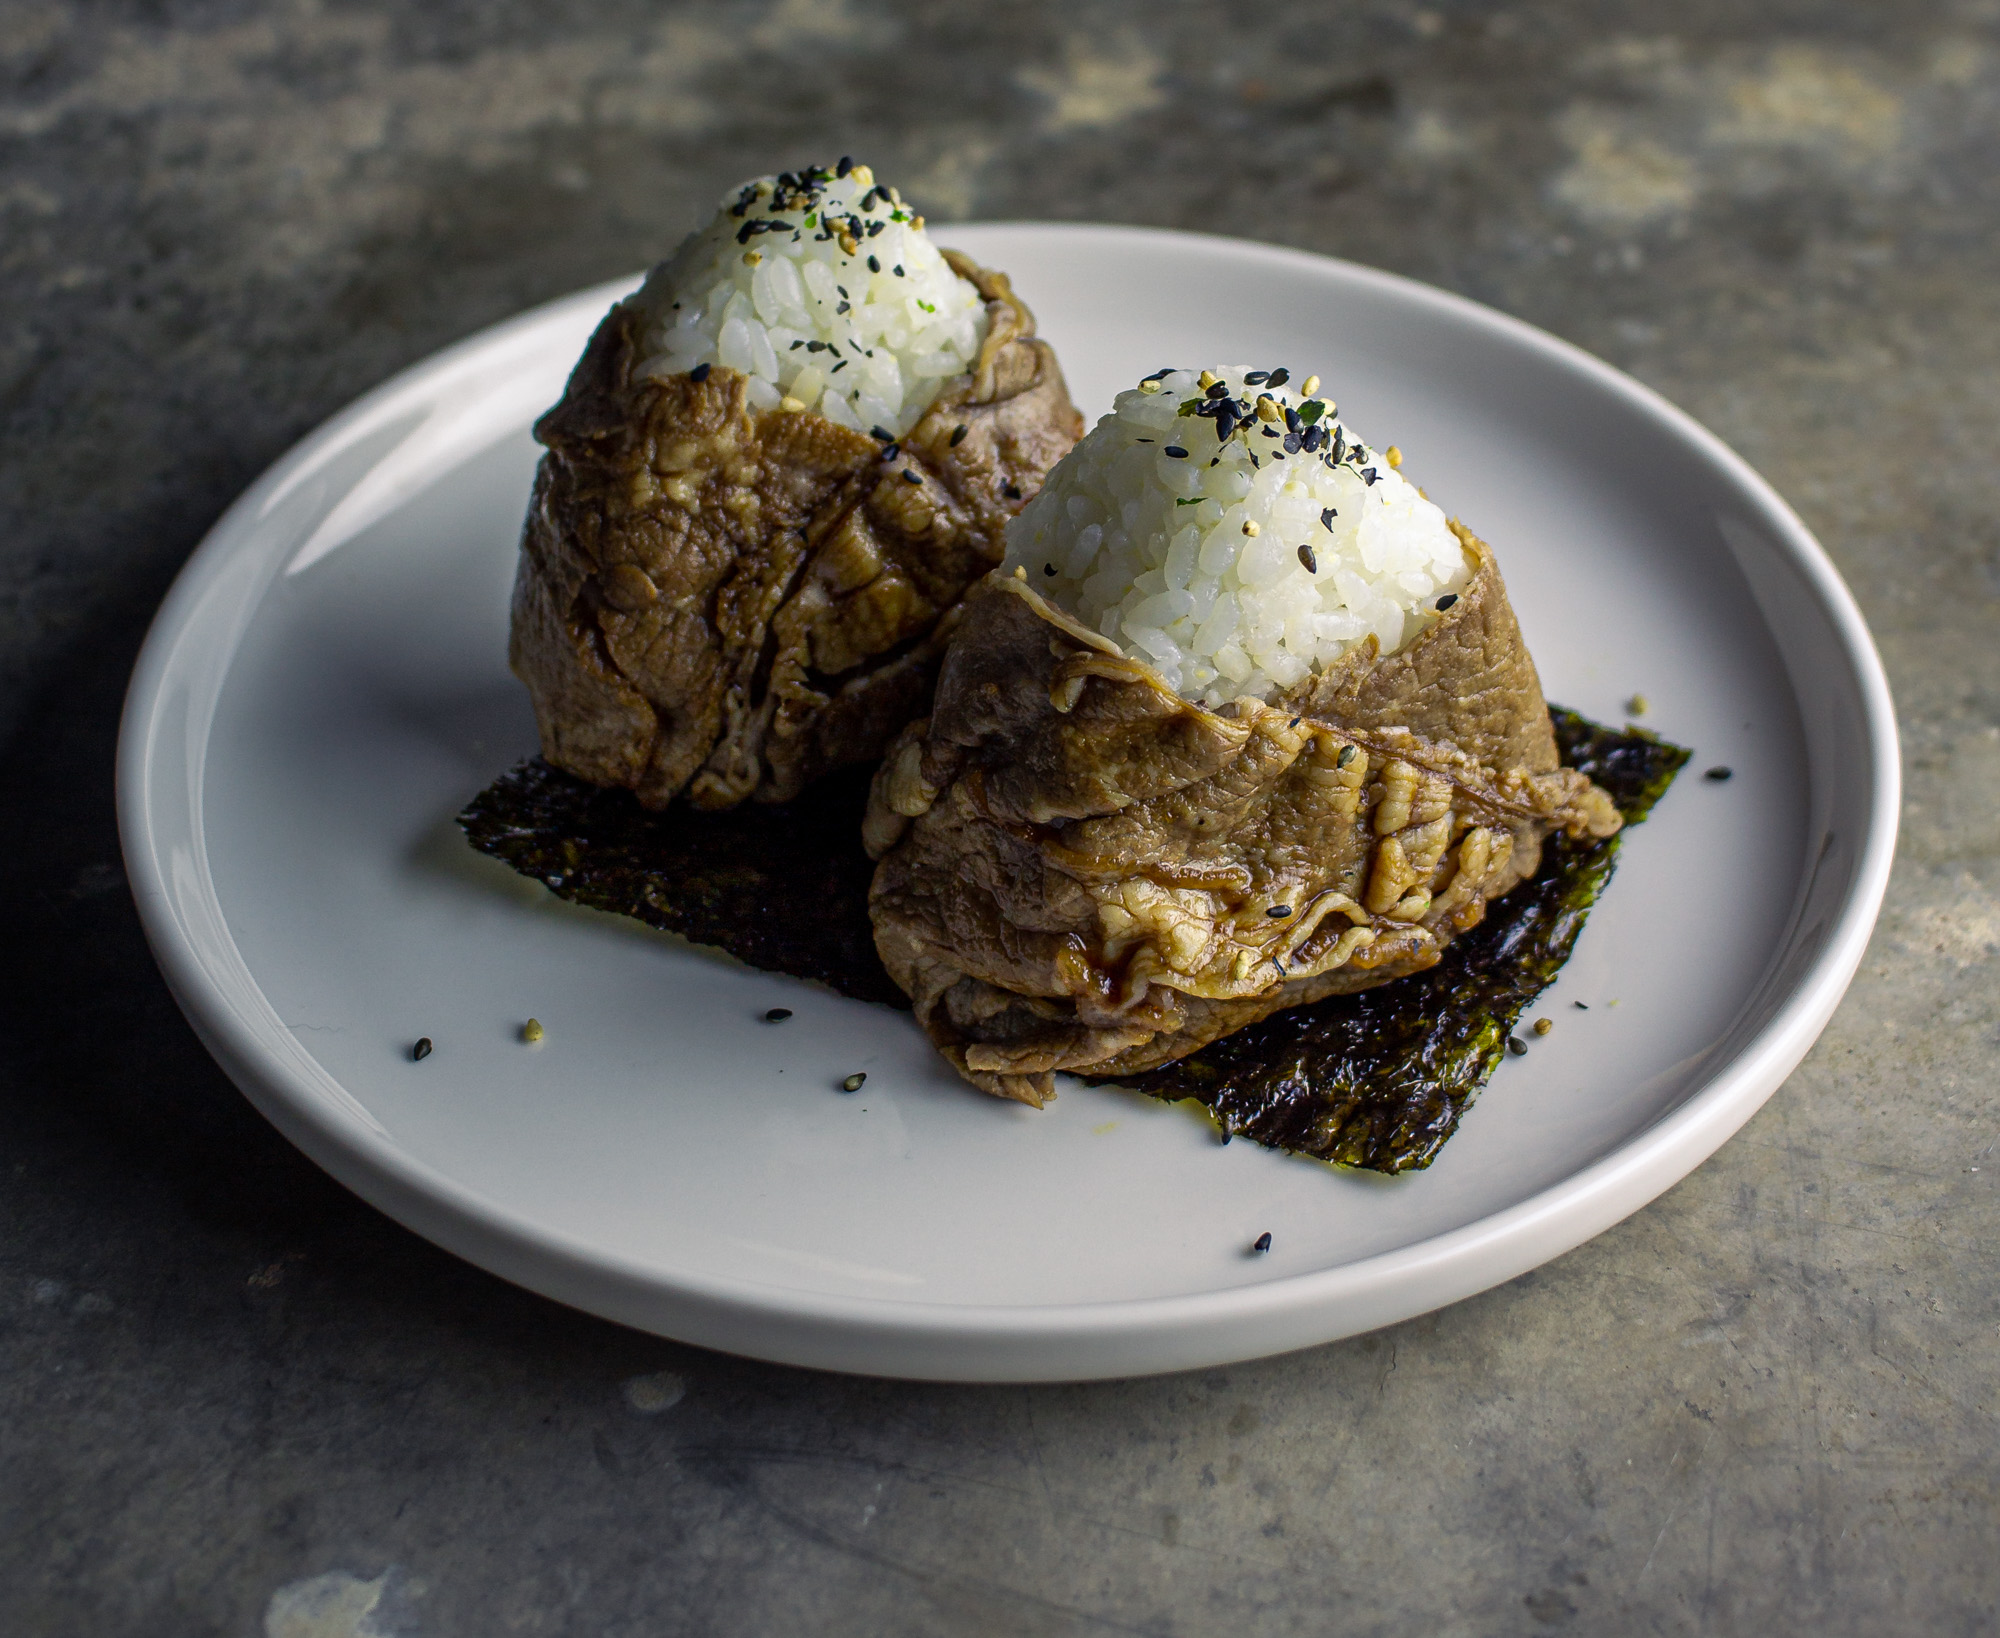
Meaty Rice Balls aka Beef Onigiri
Legend of Zelda: Breath of the Wild
Legend of Zelda: Breath of the Wild
Ingredients
Makes 6-8 large or 12 mini onigiri
- 2 cups sushi rice or Japanese short grain rice
- 1/2 lb flank steak
- 1 Tbsp white miso paste
- 1 Tbsp water
- 2 tsp grated ginger
- 1 clove garlic, crushed
- 1 Tbsp mirin
- 1 Tbsp brown sugar
- ½ tsp yuzu kosho
- 1/2 lb thinly sliced beef (shabu shabu beef)
- ¼ cup soy sauce
- 1 Tbsp sesame oil
- Seaweed furikake
Marinate the beef: combine the miso, ginger, garlic, mirin, brown sugar and yuzu kosho in a bowl and whisk to combine. Coat the flank steak with the marinade, cover tightly and refrigerate overnight.
The next day, prepare the rice according to your package instructions. Allow the rice to cool to room temperature.
Pat the beef dry and sear in a skillet lightly coated in oil over high heat for about five minutes per side. Let rest for at least 10 minutes. In the same skillet, reduce the heat to medium low. Add the soy sauce and sesame oil and use a wooden spoon to scrape up any browned bits from the bottom of the pan. When the sauce is bubbling, briefly dip the thinly sliced beef into the sauce, cooking for about a minute per side, coating each side in the sauce. Set the sliced beef aside to drain on paper towels.
Slice the flank steak as thinly as possible against the grain. If necessary, cut your slices again to create small, bite-sized morsels.
To assemble, use wet hands or an onigiri mold to create rice triangles. Place a few morsels of marinated steak in the center of the triangles and then cover with more rice. Press to seal. Next, wrap each onigiri in a blanket of the soy-dipped beef, arranging it like the onigiri is wearing a beef shawl. Finally, sprinkle furikake on the top of each onigiri, on the area where the rice is exposed.
Recipe Notes
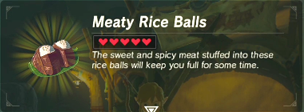
Onigiri is a Japanese rice ball snack, sometimes stuffed with fillings, and often wrapped in nori (seaweed). In Legend of Zelda: Breath of the Wild, you can make a dish called meaty rice balls, which are described as follows, “the sweet and spicy meat stuffed into these rice balls will keep you full for some time.”
In the game they are depicted as triangular-shaped with thinly sliced beef wrapped around the bottom like a little beef shawl. There is no exact Japanese equivalent to this dish that I could find, but it’s clear that this is an onigiri rice ball with beef on the inside and outside.
There are real life variations of beef onigiri that we can take inspiration from to create this dish. One is nikumaki onigiri, which is a rice ball fully encased in thinly sliced beef, and then quickly seared in a hot pan and then sauteed in a sauce. The other is an onigiri stuffed with beef shigureni, which is a stewed beef that is cooked in a sauce and then the sauce is reduced until the beef is tender and caramelized. This one does not have beef wrapped on the outside.
So for my version, I’m going to take cues from the video game and do my own thing. To make a “sweet and spicy” meat filling, I use brown sugar for sweetness and yuzu kosho for spiciness. Yuzu kosho is a Japanese chili paste made from green chilies and yuzu, which is a special Japanese citrus fruit. Yuzu kosho combined with white miso paste will bring a ton of umami to the steak marinade. I chose to marinate a flank steak because it’s quick-cooking, but these ingredients would be nice in a slow braise as well.
The meat wrapped on the outside was a bit of a challenge to devise, because as much as I wanted to sear the meat onto the rice ball like the nikumaki onigiri method, I feared this would not work with the visual representation we have in the game. Some of the rice is exposed in the game version, so I decided to cook the meat blanket separately to avoid a mess in the skillet. I used thinly sliced sukiyaki beef for this part. A trip to my local Japanese supermarket was essential for this dish. While some of the ingredients can be found online, I really wanted to use beef butchered Japanese style for this dish because sukiyaki beef is fatty and tender after just a quick turn in the pan.
References
Meaty Rice Balls from Legend of Zelda: Breath of the Wild
Miso-Marinated Flank Steak, Bon Appetit
Traditional Onigiri from Just One Cookbook
More Legend of Zelda Cooking!
Alternate Meaty Rice Ball recipes for you to try
Miso Beef Onigiri by the Missing Lokness
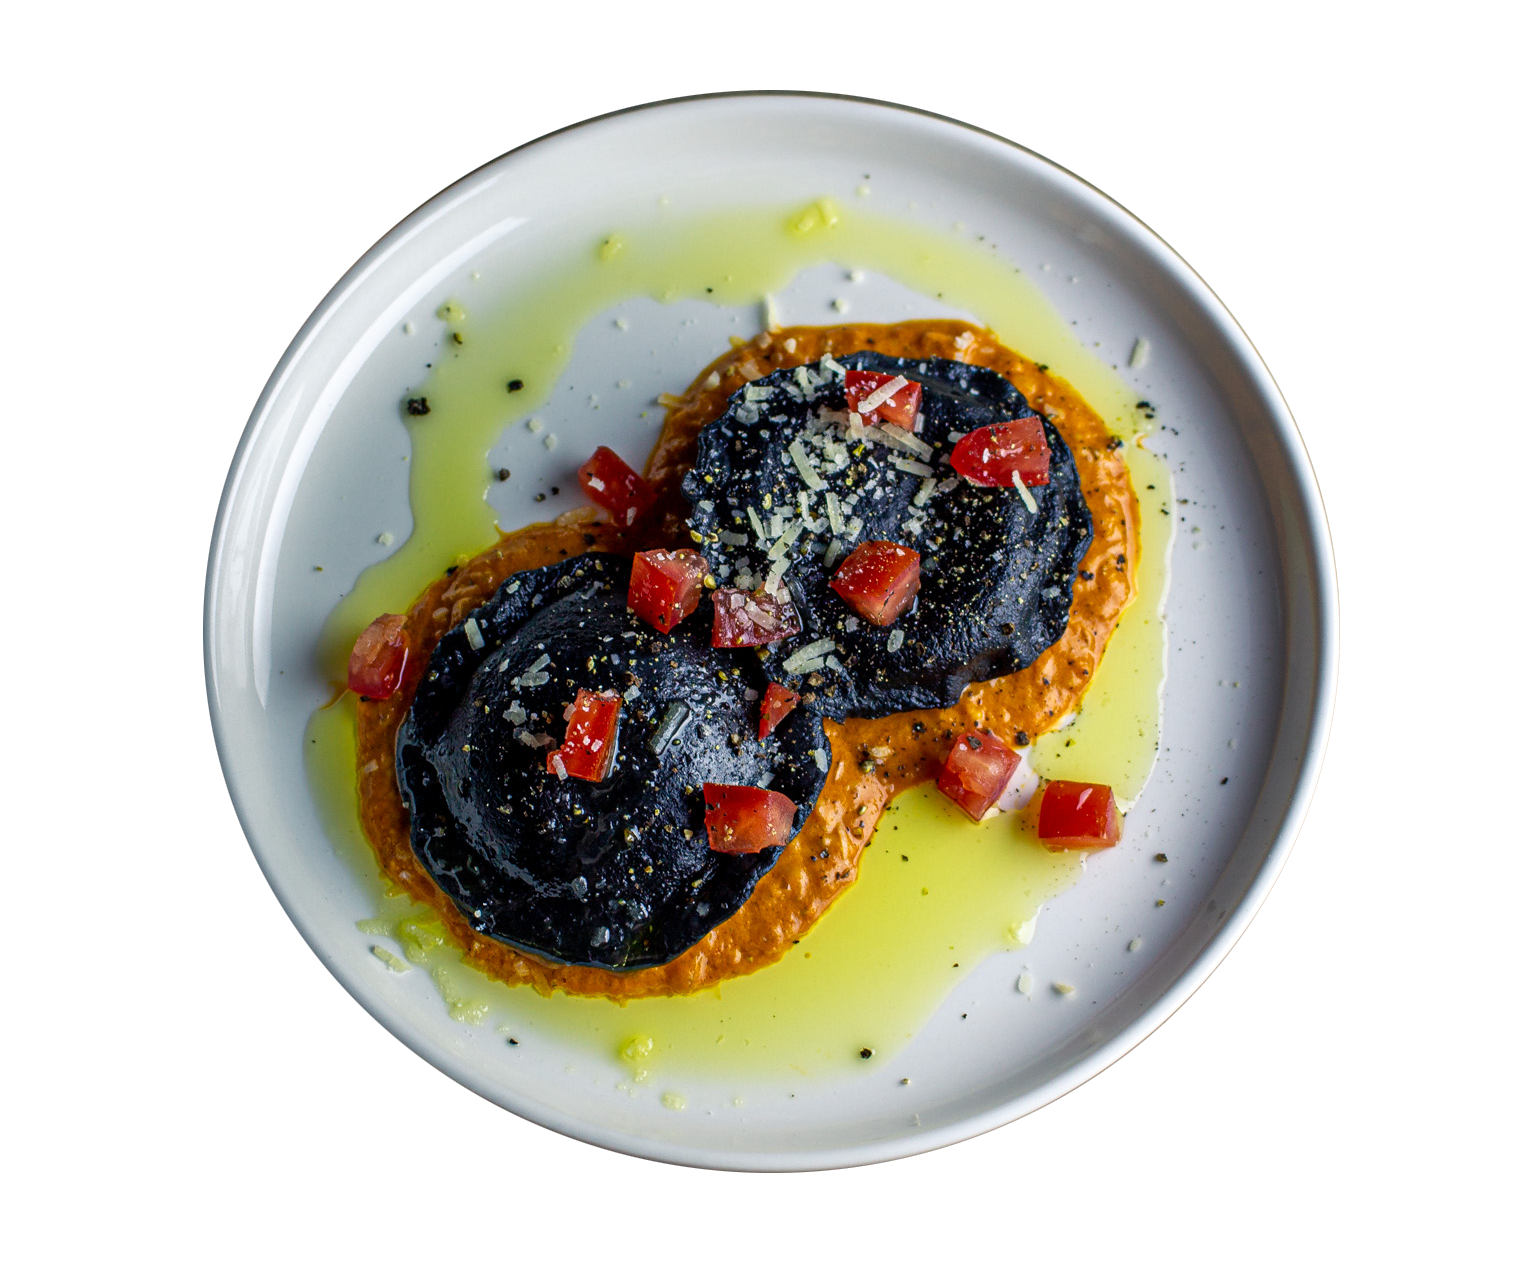
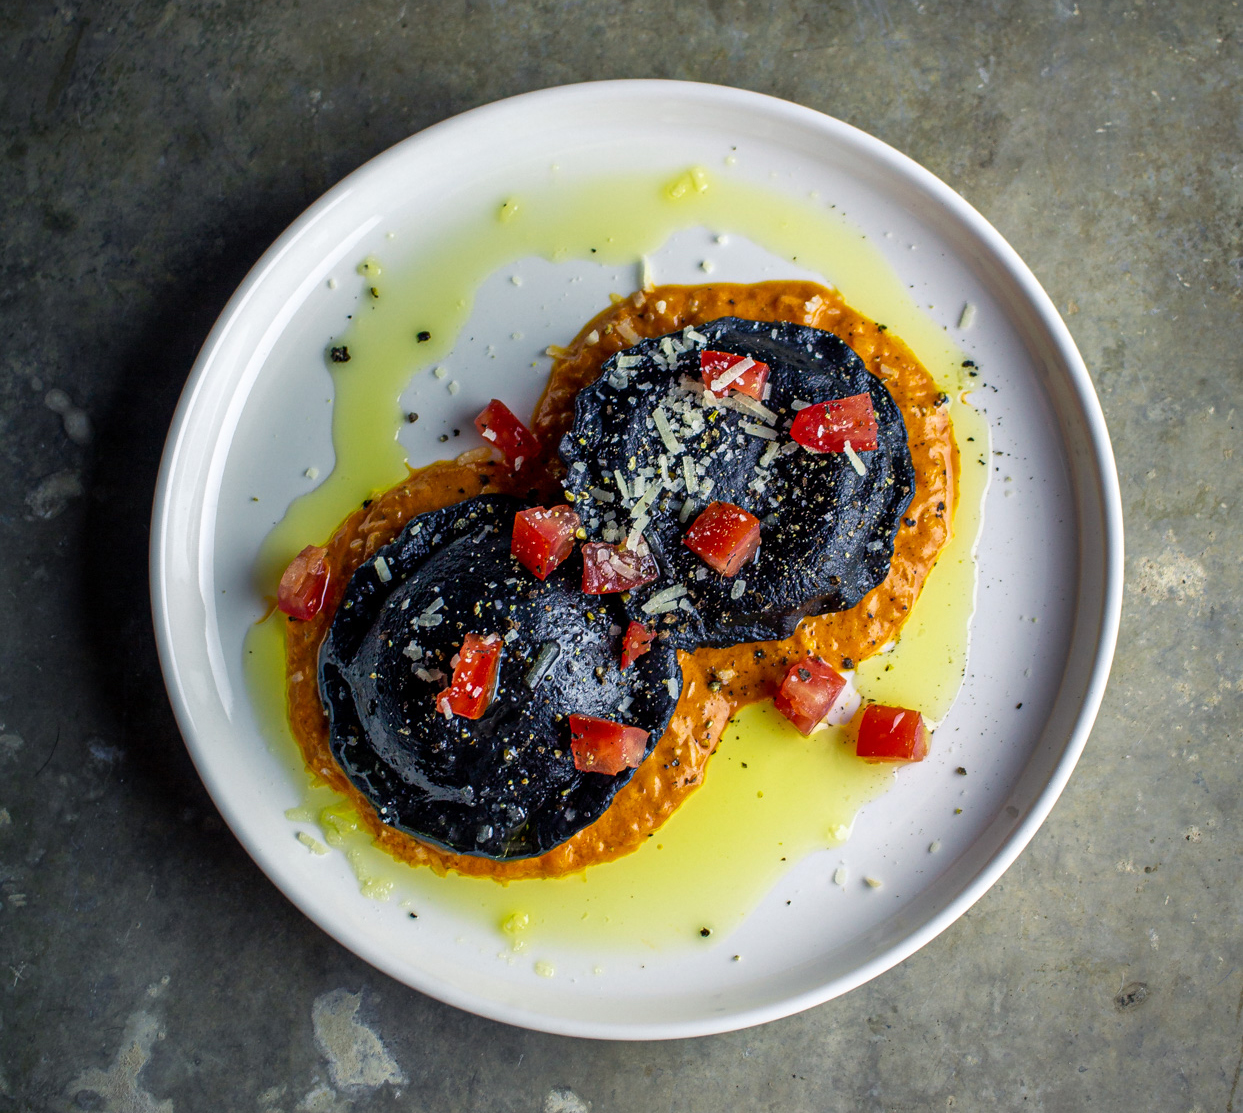
Squid Ink Ravioli
Stardew Valley
Stardew Valley
Ingredients
Makes 8 - 10, 3" ravioli
- 1 cup + 2 Tbsp Tipo 00 Flour
- 2 eggs
- Pinch of salt
- 1tsp of squid ink
Pasta filling
- 8 oz Ricotta cheese
- ½ cup Parmesan cheese
- ⅓ cup
- 1 tsp lemon zest
- Salt and pepper
Roasted Red Pepper Sauce
- 12 oz. roasted red peppers
- 1 Tbsp butter
- 2 cloves garlic, minced
- 1 shallot, minced
- ½ cup half and half
- 1 Tbsp fresh basil leaves
- Pinch of red pepper flakes
- Salt and pepper
Garnishes
- Fresh basil
- Parmesan cheese
- Seeded and chopped roma tomatoes
To make the pasta: Combine the eggs, 1 cup flour, squid ink and salt in a food processor and pulse until the flour is fully coated and the mixture is crumbly. Turn out onto a cutting board and knead until smooth. (You may want to wear gloves) If the dough is too sticky, add more flour, a tablespoon at a time as you knead until it is smooth. Cover with plastic wrap and let rest at room temperature for one hour. Divide the dough into two and roll out on a floured surface. If you have a pasta maker, feel free to use it. Roll the dough as thin as possible. Cover the pasta sheets with plastic wrap while you make the filling.
To make the filling: combine all filling ingredients in a bowl and mix to combine.
To make the sauce: place the roasted red peppers, half and half and basil in a blender and blend until smooth. Heat the butter in a saucepan over medium heat. Add the shallot and garlic, and saute until just translucent, about three minutes. Add the red pepper sauce to the pan and cook for another three minutes, lowering the heat to medium low. Add the red pepper flakes and season with salt and pepper. Reduce the heat to low and keep warm while you finish the pasta.
To assemble: Heat a large pot of salted water over high heat until boiling. Place rounded tablespoons of filling spaced equally apart on the lower ½ of the dough sheet. Fold the upper half of the sheet over the filled half and press out any air bubbles around the filling mounds. Cut the pasta with a pasta cutter or knife, then press the edges again with your fingers to form a seal. Transfer the ravioli to the boiling water and cook for 10 minutes or until the pasta begins to float to the surface. Remove with a slotted spoon. Spoon a small spoonful of sauce onto the plate and top with a ravioli. Garnish with fresh basil, chopped roma tomatoes and parmesan cheese.
Recipe Notes
So what’s up with squid ink pasta? Where did it come from? The origins of squid ink pasta come from Sicily, Italy, which is on the Mediterranean and known for seafood. The ink product that is used for the pasta is actually from the cuttlefish, which is a Cephalopod similar to a squid. In Italy, they are called seppia. And, fun fact, the word sepia, as in the pigment, is derived from the latinized version of the greek word, which means cuttlefish. So cuttlefish ink was initially used for writing.
A popular Sicilian squid ink pasta dish is spaghetti al nero di seppia, which involves a squid ink sauce consisting of both chopped squid and the ink, as well as tomatoes, garlic and white wine. The sauce coats the pasta in an inky black sauce, but the noodles themselves do not contain squid ink.
I’m not sure when the viscous cuttlefish ink made it inside the pasta dough, but the result is really eye-catching. It’s SO dark, SO black, and SO unusual. Taste-wise, as of this writing, I’m actually not sure what it tastes like because this is my first time making squid ink pasta. So we’ll wait to see what That Lucky Bear thinks. I imagine it’s a bit briny.
I used this cuttlefish ink for my pasta, and I wore gloves to keep my hands clean when mixing the dough. For the filling, I decided to go with a very basic cheese ravioli for the first time around. In my research for this dish I found that many recipes use salmon, crab or lobster as a filling as well.
The red pepper sauce was chosen more for it’s visual appeal than anything else, so we’ll have to see if the flavors go well together, but I imagine they will.
This squid ink ravioli dish is inspired by Stardew Valley. In the game, once you have access to a kitchen, you can cook a wide variety of dishes to give your character health, energy and other status effects. Since squid ink is monster loot from the mine, the recipe provides a mining buff and the “squid ink ravioli buff” which prevents all debuffs for nearly three minutes. More Stardew Valley squid ink ravioli facts can be found on the Stardew Valley wiki.
References

The Squid Ink Ravioli game sprite from Stardew Valley
Black Squid Ink Ravioli with Szechuan Grilled Chicken Filling by Unilever Food Solutions
Fresh Squid Ink Pasta Recipe by Serious Eats
Sicilian Cuttlefish by Roberta Gangi of Best of Sicily Magazine
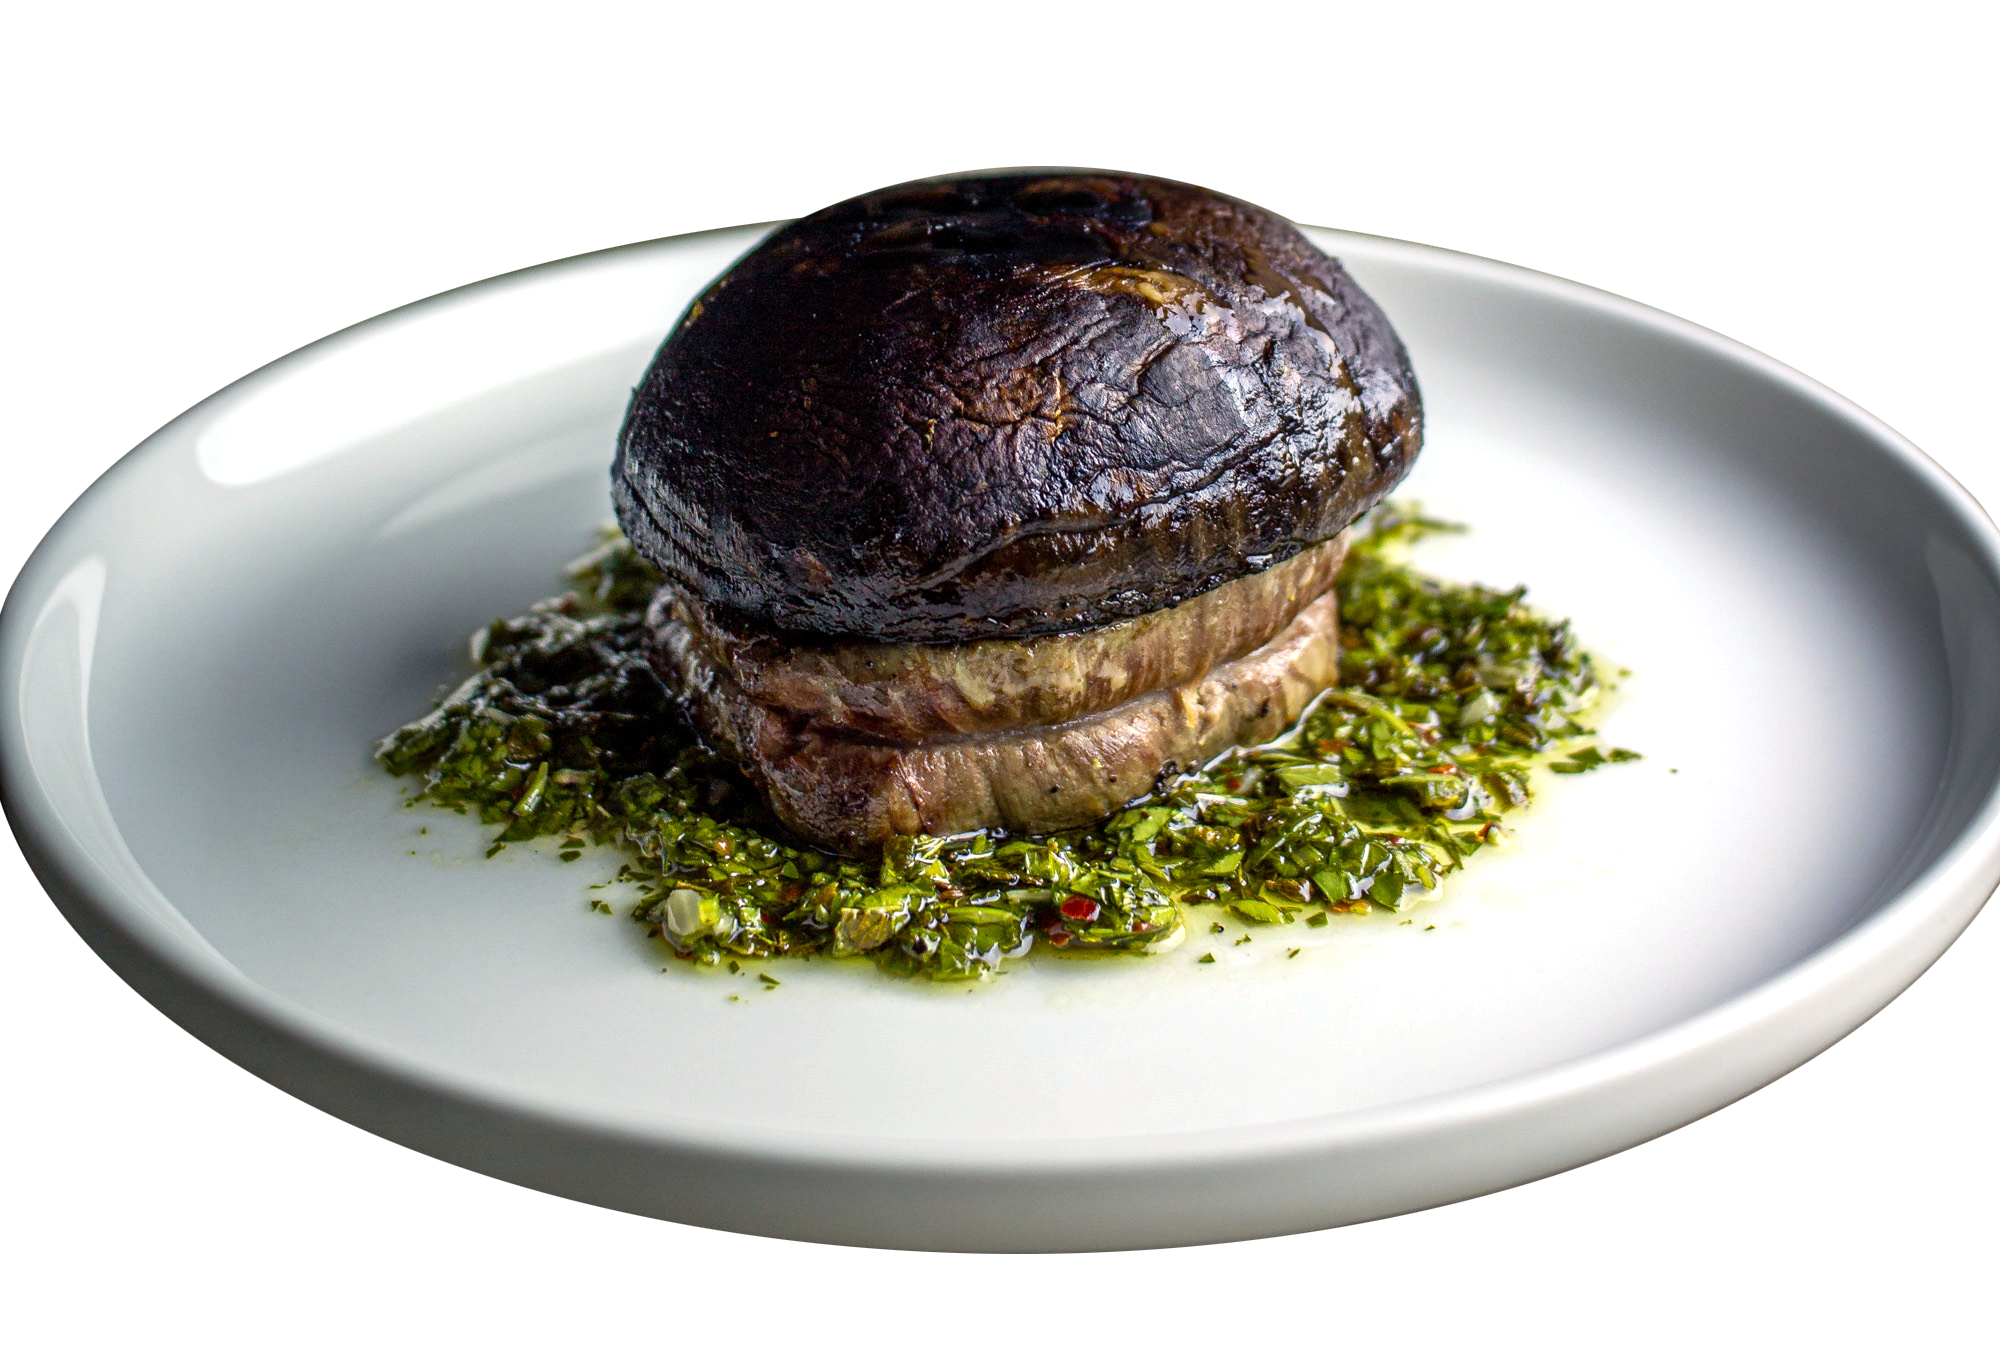
Shroom Steak, aka Petit Filet Sous un Champignon
Paper Mario
Paper Mario

Ingredients
Makes 1
- 1, 5 oz. filet mignon
- 1 portobello mushroom
Marinade
- 1 Tbsp balsamic vinegar
- 1 Tbsp soy sauce
- 2 Tbsp olive oil
- 1 tsp white miso paste
- 1 garlic clove, minced
- 1 tsp lemon zest
- Salt & pepper
Chimichurri
- ¼ cup chopped parsley
- 1 Tbsp red wine vinegar
- ½ garlic clove, minced
- 1 tsp oregano
- ¼ tsp red pepper flakes
- Salt & pepper
Combine the marinade ingredients in a shallow dish. Stem the portobello and scrape the underside of the cap with a spoon to remove most of the gills. Place the mushroom in the dish and let it marinate for at least 30 minutes, flipping halfway through.
Meanwhile, combine all the chimichurri ingredients in a small dish and set aside to let the flavors meld at room temperature.
Let the filet sit at room temperature for about 30 minutes, pat dry with paper towels if necessary, and then season liberally with salt and pepper. Heat a grill, grill pan or cast iron skillet over high heat. If your pan requires oil, add a small amount. Sear the filet, cooking for about five minutes on the first side, then three on the next side. Check the internal temperature - 130 for medium rare, 140 for medium. Let the steak rest while you cook the mushroom. Sear the mushroom, cap side down, in the same skillet for three to five minutes. Flip and cook until just tender. To plate, spoon a layer of chimichurri first, then top with the filet, then cover the filet with the mushroom, as if it’s wearing the mushroom like a hat. Shroom steak.
Recipe Notes
I Googled, “filet mignon under a portobello” and could not find anyone else who has attempted to do such a silly thing so we’re going to say that I invented this. In Paper Mario, you can eat a Shroom Steak, which is described as, “the height of shroom cuisine. Fills 70 HP and cures poison.” In the game it just looks like a big mushroom on a plate.
I could have simply served That Lucky Bear a grilled portobello, but that wouldn’t really work with the “spirit” of this project. So how do we make a portobello mushroom steak into a Shroom Steak? Let’s put a steak INSIDE it. Filet mignon works for me because it’s thicker, smaller and sort of round, so it fits inside a mushroom cap nicely. If you’re silly enough to re-make this recipe yourself, any steak can be used - just trim it down to size before cooking.
Chimichurri is one of That Lucky Bear’s favorite steak sauces. It’s a little bit spicy, tangy, and pungent. It’s an Argentinian sauce meant to accompany grilled meat. When making a big batch as a marinade or dressing, I like to make it in a blender. However, blending chimichurri is not the authentic way to make it, plus it’s far simpler to roughly chop your ingredients when you’re only making a small amount for one or two portions.
So that’s Shroom Steak! A grilled portobello with a steak surprise.
References

Shroom Steak from Paper Mario
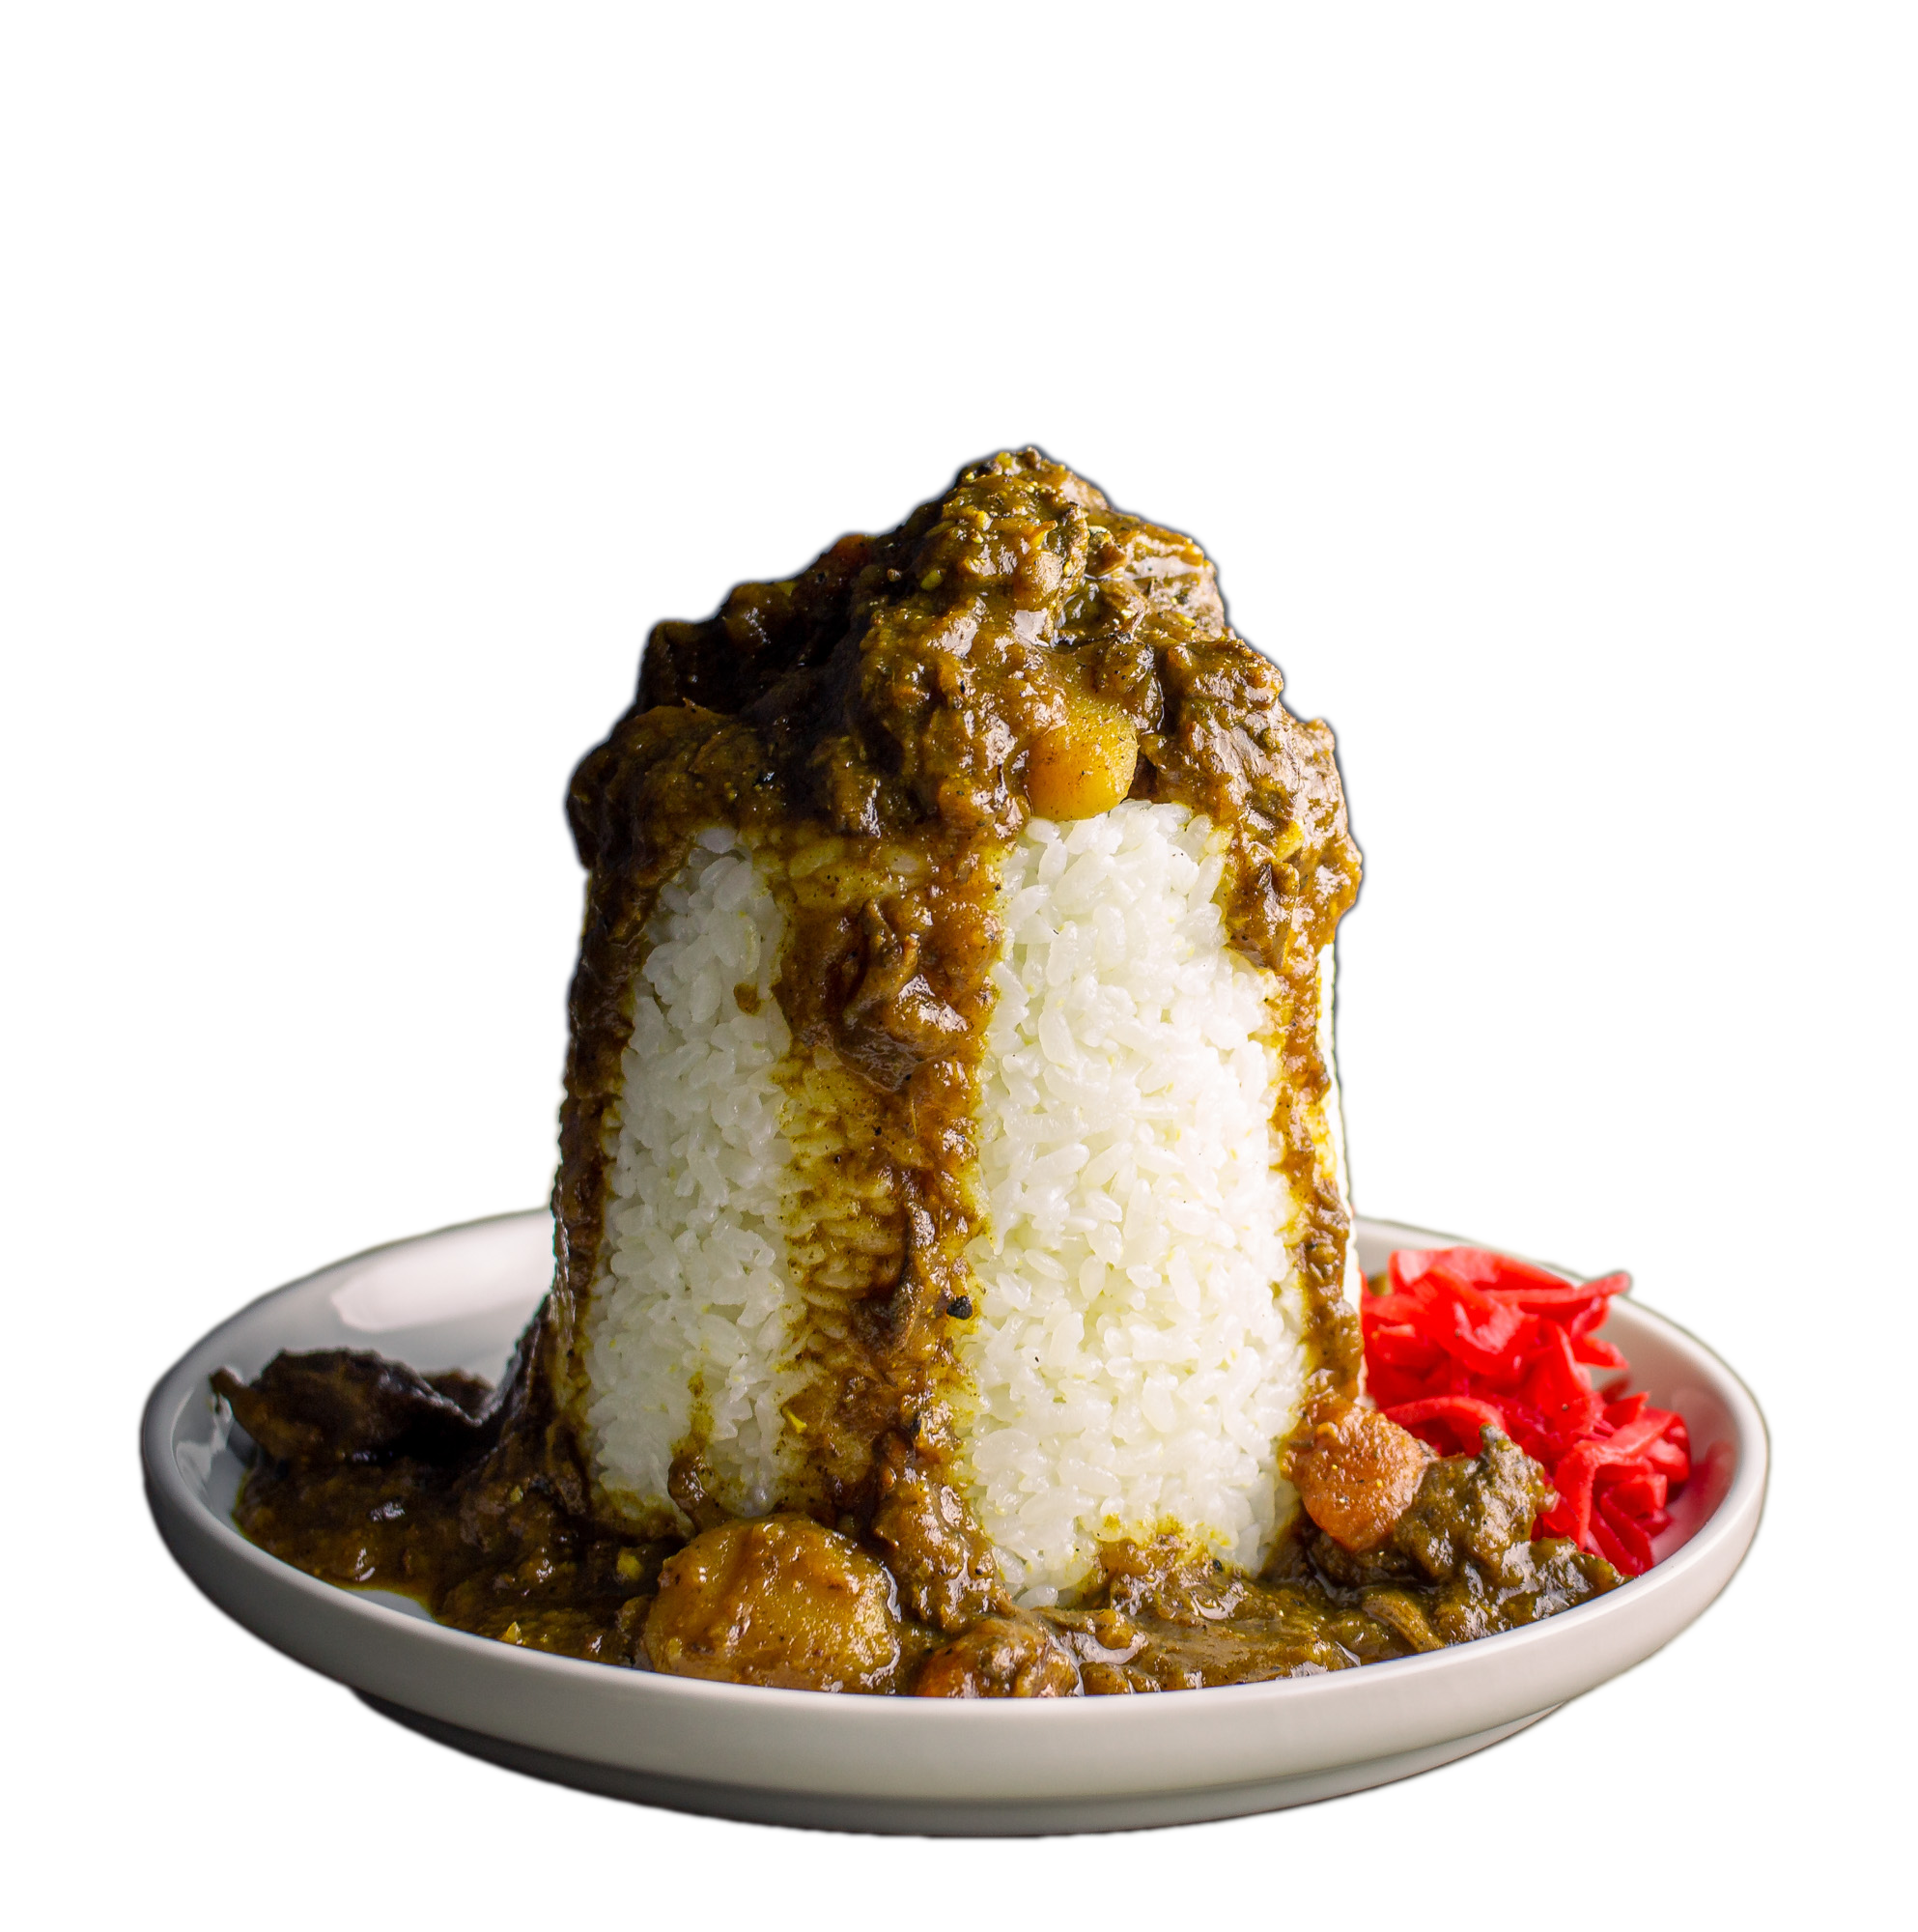
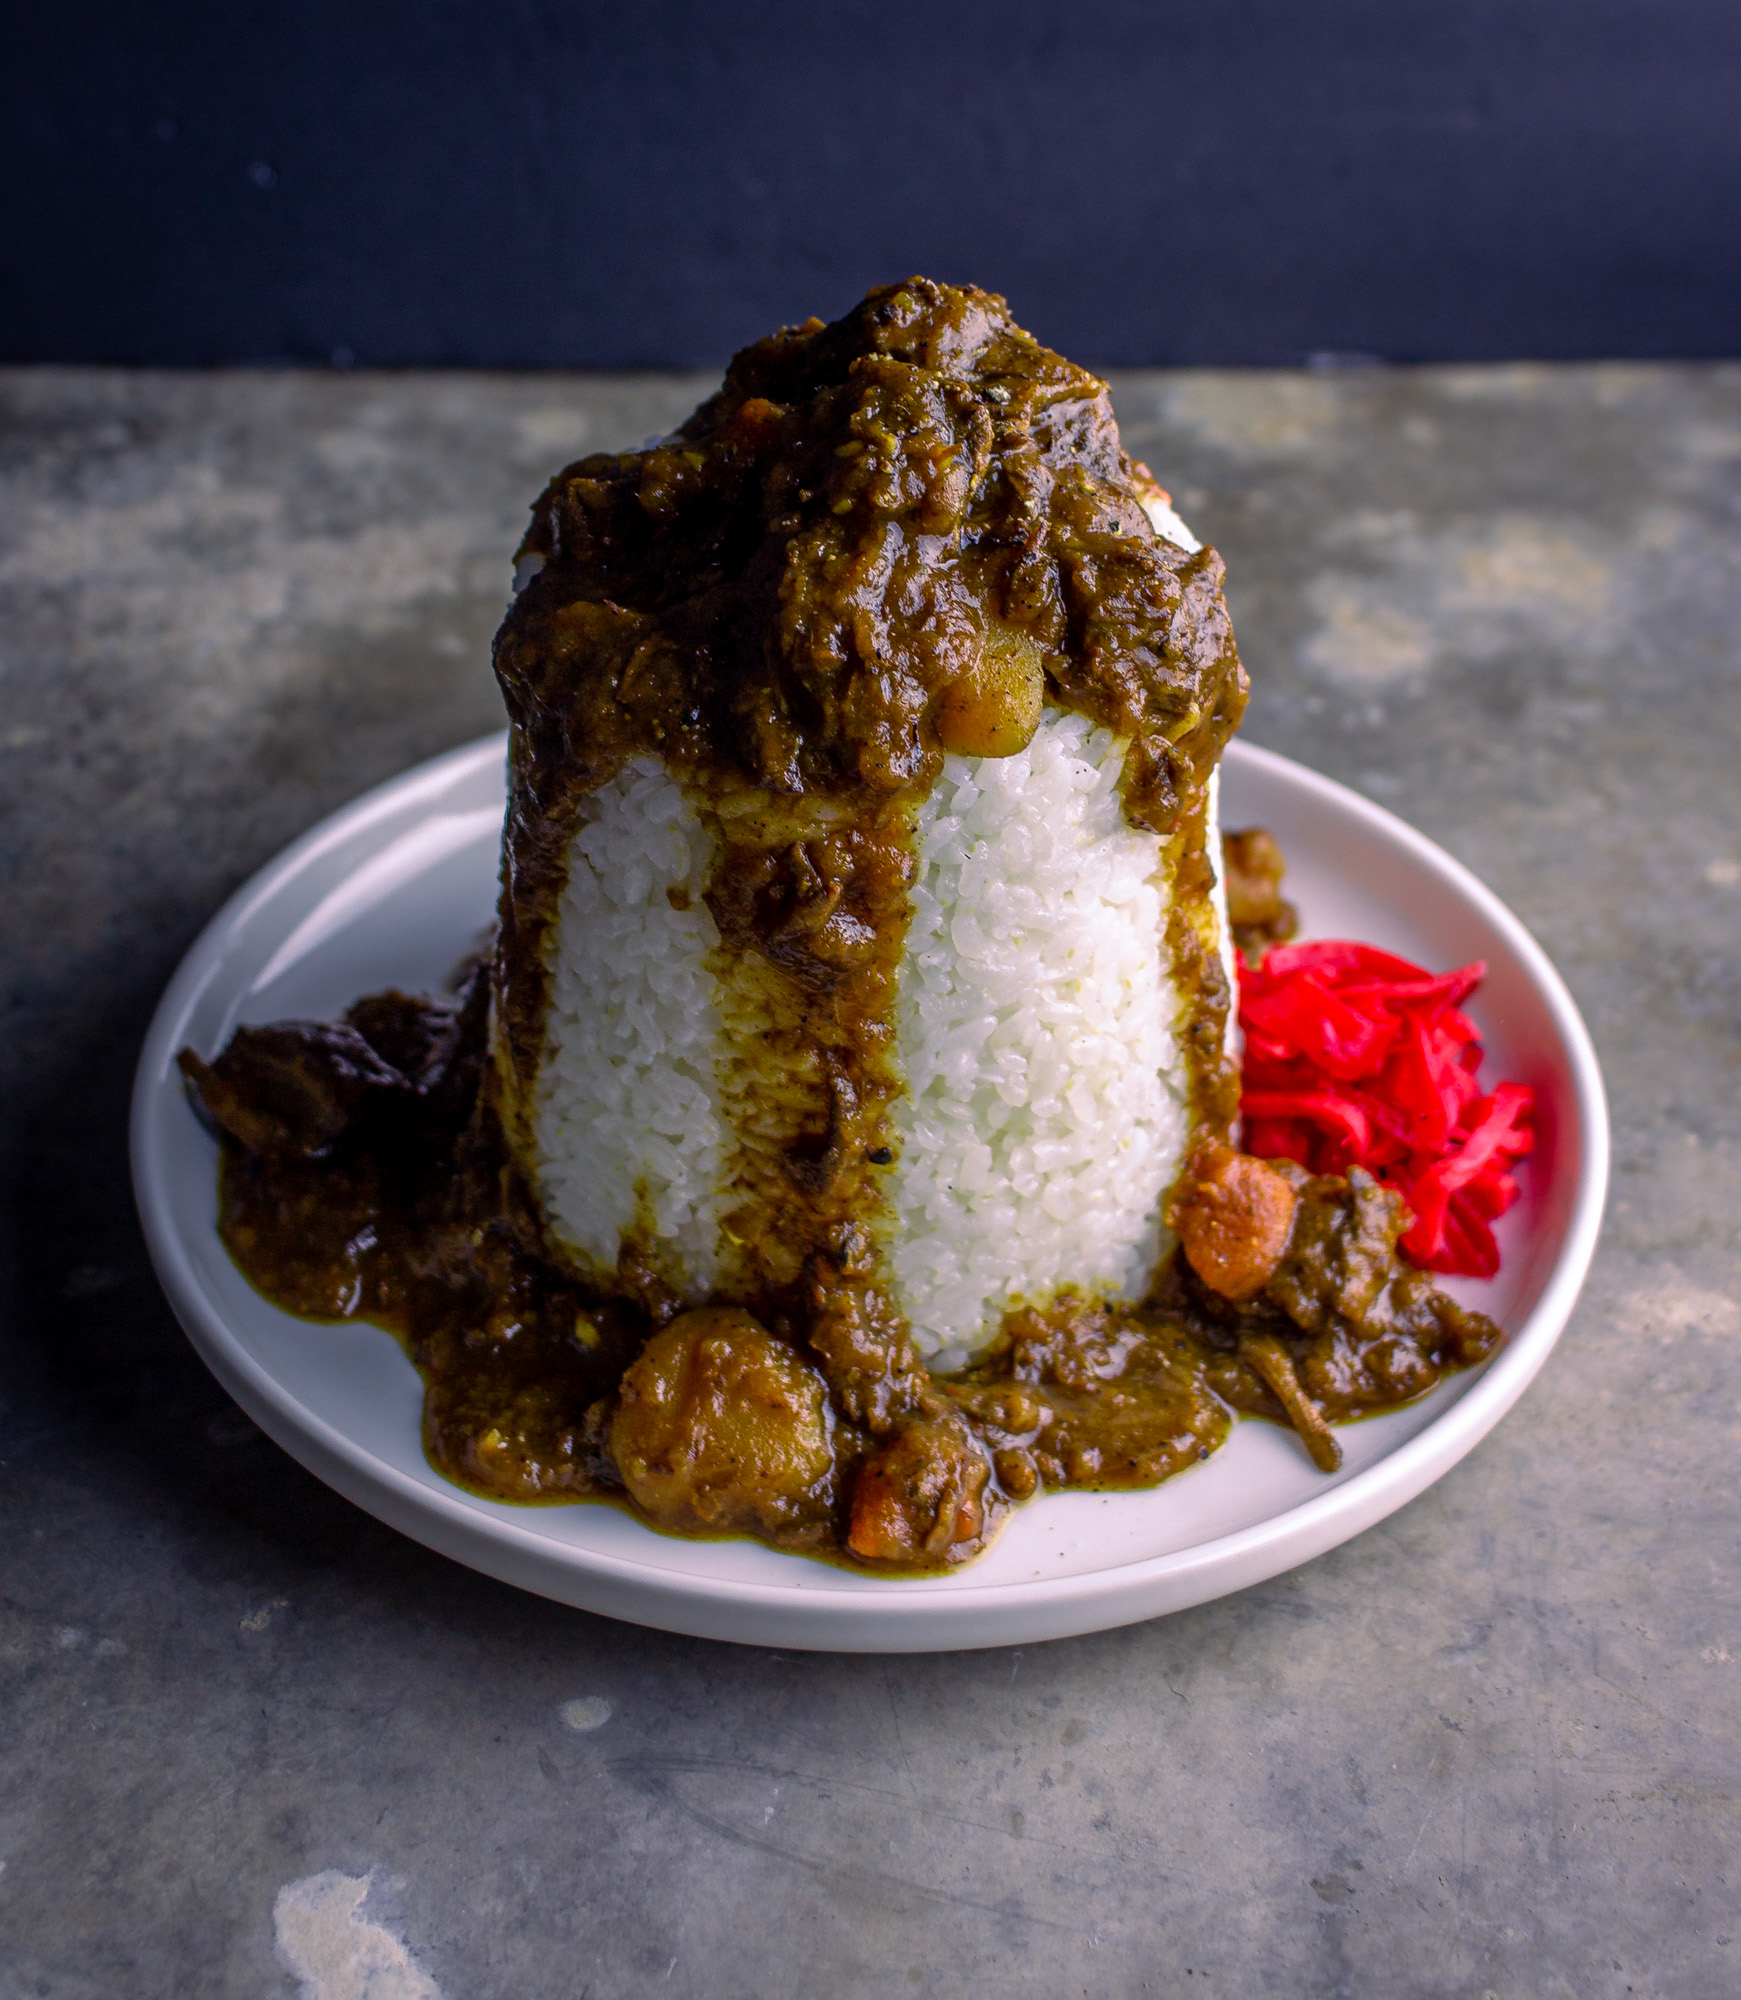
Gigantamax Curry aka Japanese Style Beef and Apple Curry
Pokemon Sword and Shield
Pokemon Sword and Shield
Ingredients
Makes roughly 3 quarts
Beef Curry
- 3 lb. Boneless Beef Chuck Roast
- 2 Tbsp olive oil
- 2 honey crisp or pink lady apples
- 1 large Onion
- 2 yellow Potatoes
- 3 Carrots
- 1” piece Ginger, grated
- 4 cloves Garlic, chopped
- 3 Tbsp butter
- 3 Tbsp flour
- 4 cups beef stock
- 2 cups water
- ½ cup red wine
- 3 Tbsp curry powder (see below)
- 1 Bay Leaf
- 2 Tbsp Tomato paste
- 1 Tbsp Soy sauce
Japanese short grain rice
Japanese Curry Powder “Spicy”
- 2 tbsp turmeric powder
- 3 tsp coriander seeds
- 3 tsp cumin seeds
- 2 star anise
- 2 tsp fenugreek
- 2 tsp black peppercorns
- 1 ½ tsp fennel seeds
- 1 tsp cayenne
- 1 tsp ground cinnamon
- 1 tsp ground ginger
- 1 tsp garlic powder
- 1 tsp ground nutmeg
- 1 tsp cardamom pods
- 1/2 tsp allspice berries
- 1/2 tsp ground cloves
- 1/2 tsp thyme
- 1/2 tsp ground sage
First make the curry powder. This will make a bit more than you need for this recipe. Combine all the spices in a dry skillet and heat over medium low heat. Stir frequently, toasting for only a few minutes until fragrant. Remove from the heat immediately and set aside to cool. Transfer the toasted spices to a spice grinder and grind until fine.
To make the curry: Peel and cut the carrots into bite-sized rounds or chunks. Peel and slice the onion into ½” pieces. Peel and cut the potatoes into bite-sized chunks. Peel and core both apples, cut one into bite-sized pieces and grate the other one. Cut the beef chuck into 1” - 1 ½” cubes. Heat a large dutch oven over medium high heat and coat with the olive oil. Sear the beef in batches, being careful not to overcrowd the pan. Brown the meat well on all sides, then remove and continue with the rest of the beef until all the pieces are well-browned on the outside. With all the beef removed from the pan, add the butter and onions. Cook, while stirring and scraping up browned bits from the bottom of the pan with a wooden spoon. Cook the onions until they start to become translucent, but not browned. Next add the flour and three tablespoons of curry powder. Coat the dry ingredients with the fats left in the pan, stirring continuously. Add the tomato paste and stir to combine. Add the wine and scrape the bottom to deglaze. Stir well to incorporate the paste into the wine and cook for a minute or two. Add the broth and water and stir, then add in all the meat, fruit, vegetables, garlic and ginger. Stir until all is combined.
Reduce the heat to medium-low and simmer partially covered for two hours, or until the meat is tender. Remove the lid and simmer for another 30-40 minutes until the sauce has thickened.
Prepare your rice according to the package instructions. To make a Gigantamax Curry mountain as seen in Pokemon Sword & Shield, use a 32 oz. deli to-go container. Press the rice into the container and then turn out onto a plate. Top the rice mound with your curry and serve!
Recipe Notes
I chose to make a Japanese-style curry for this Gigantamax Curry because well, Pokemon is a Japanese game. According to my research, curry is super popular in Japan. There are several differences between Japanese curry and Indian or Thai curry. Japanese curries are milder, sweeter, and more stew-like. There are also popular packaged curry roux flavor cubes that are used to make Japanese curry like the Vermont Curry brand. From what I read, even though these packaged curries are labeled “hot” they are not actually very spicy. The curry above is sweet and savory, not spicy at all. It can easily be made spicy by adding chiles or more cayenne.
In Pokemon Sword & Shield, Gigantamax Curry is a special recipe in the “Curry Dex” or library of different recipes you can make in the game. The curry requires a Gigantamix ingredient which is dropped by winning Max Raid battles. The curry looks like a huge glowing mountain of rice topped with red curry. It’s also glowing pink. I’m serving pink pickled ginger (benishoga) as a condiment as a little nod to the pink glow.
References
Gigantamax Curry from Pokemon Sword and Shield
Japanese Curry Powder by Okonomi Kitchen
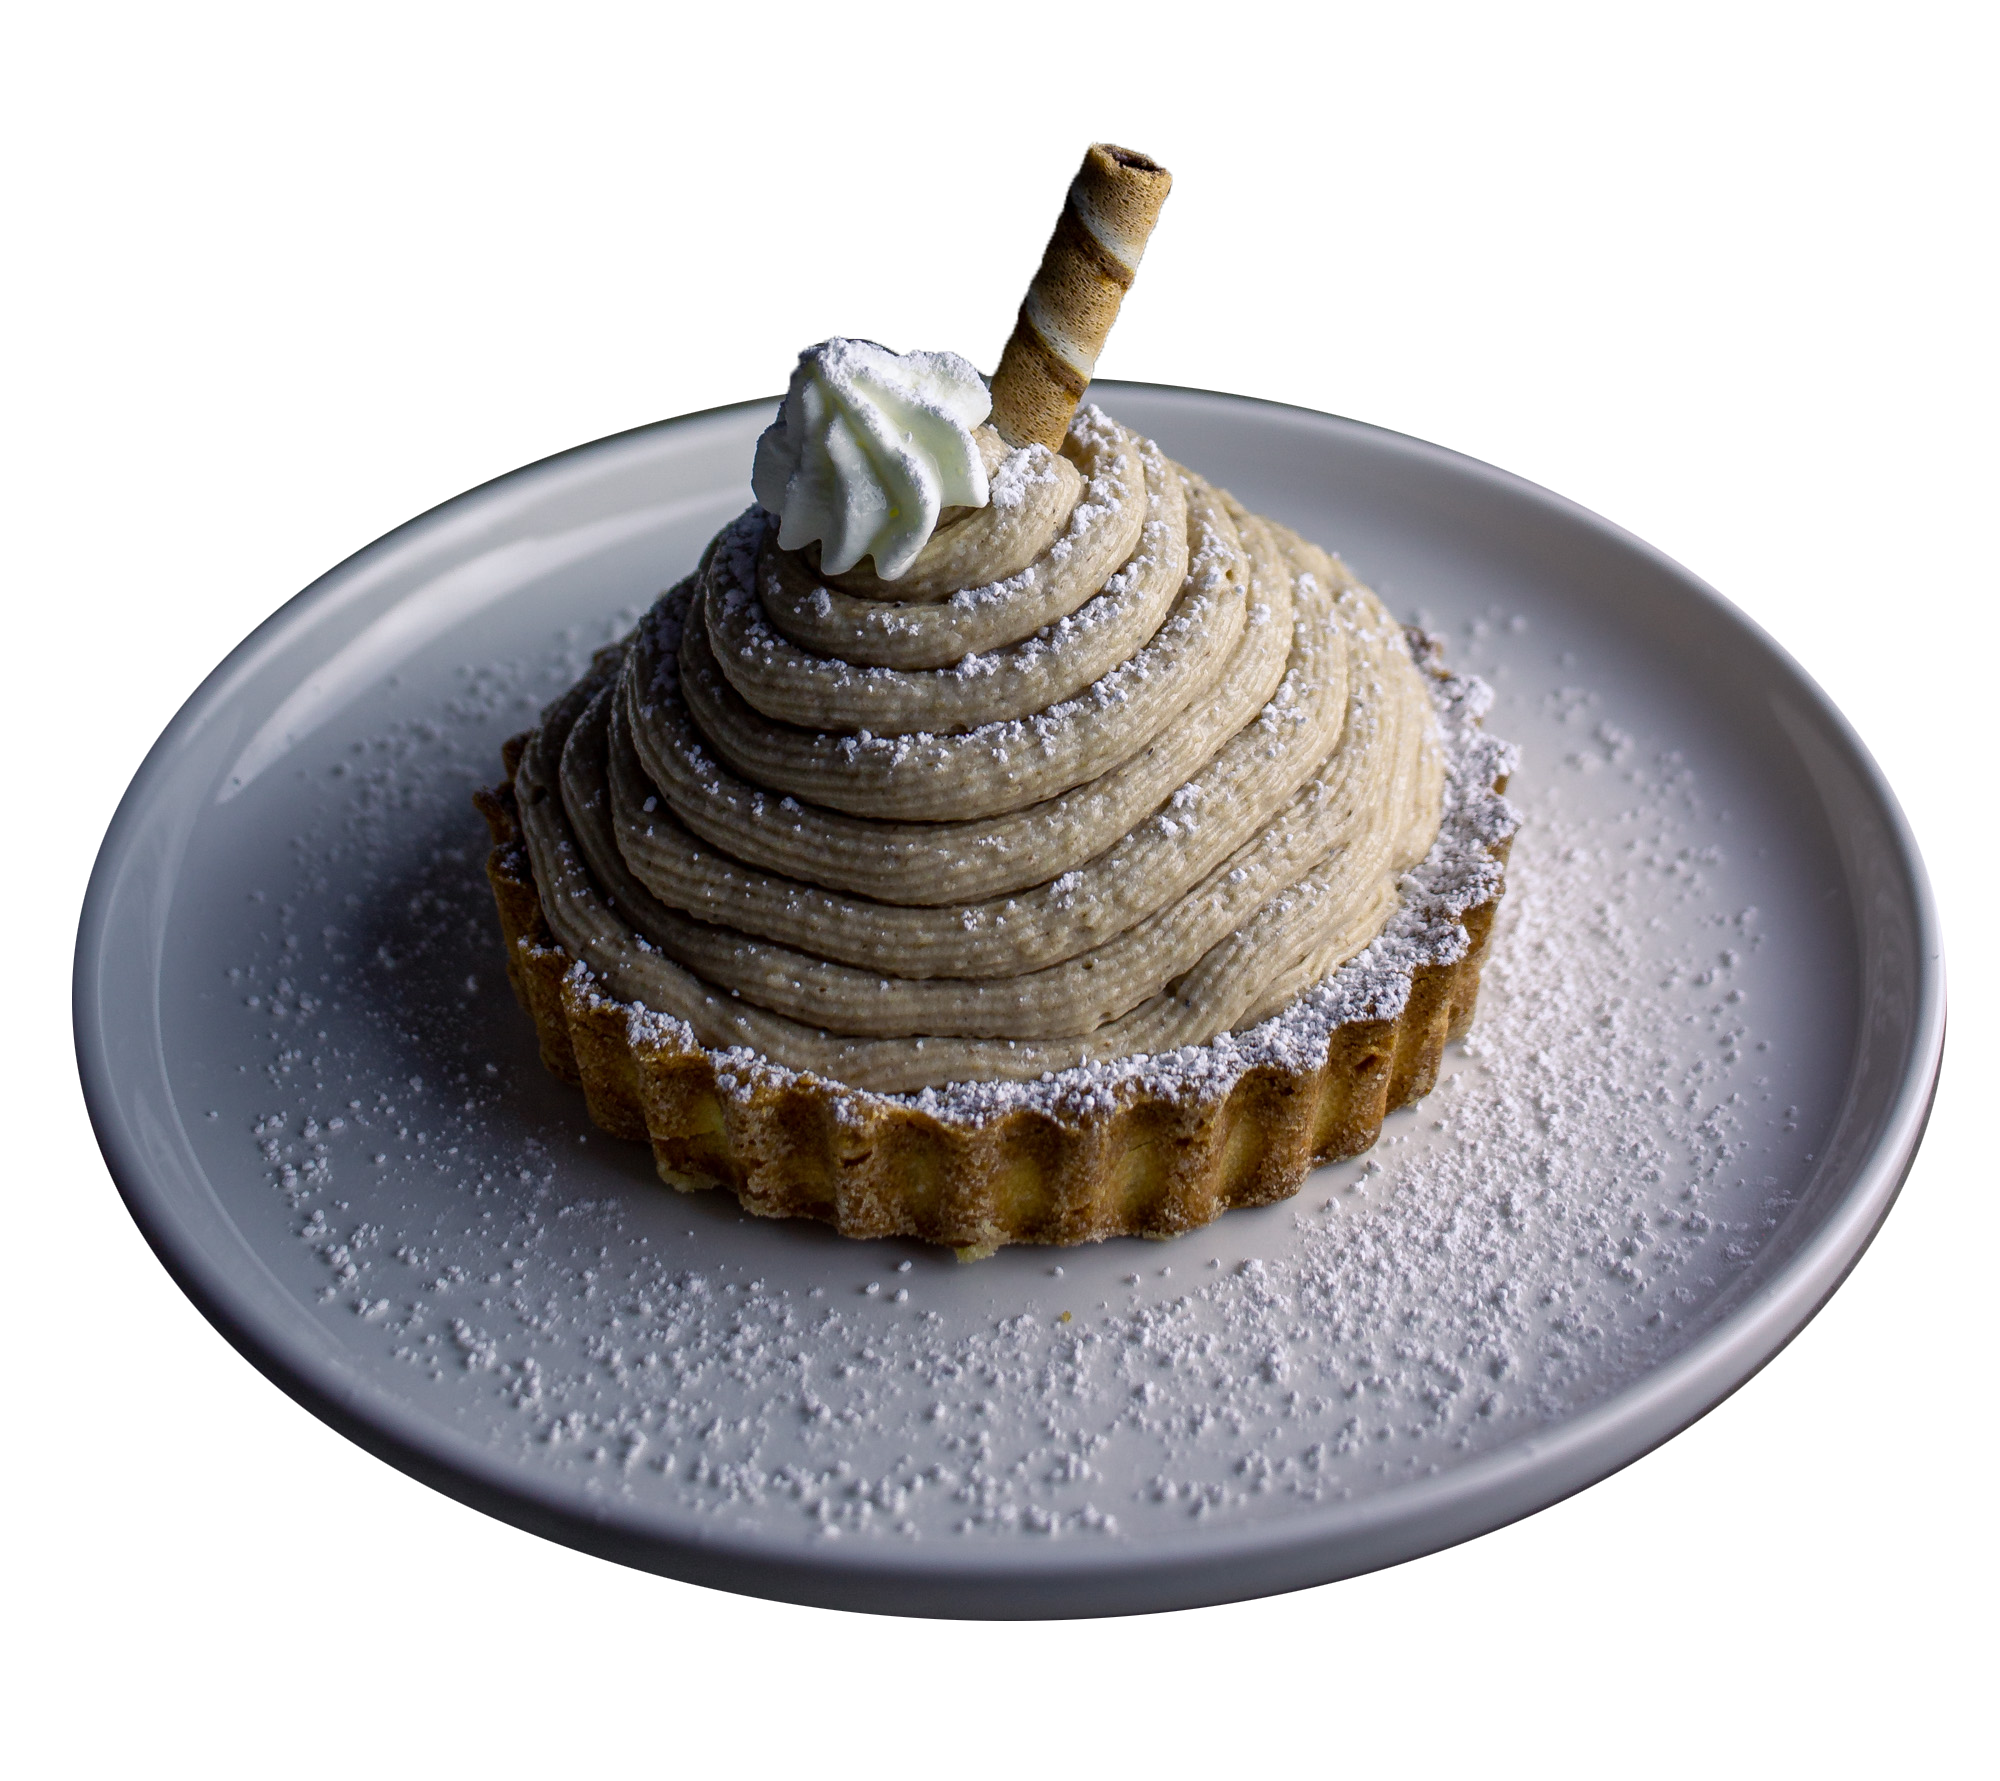
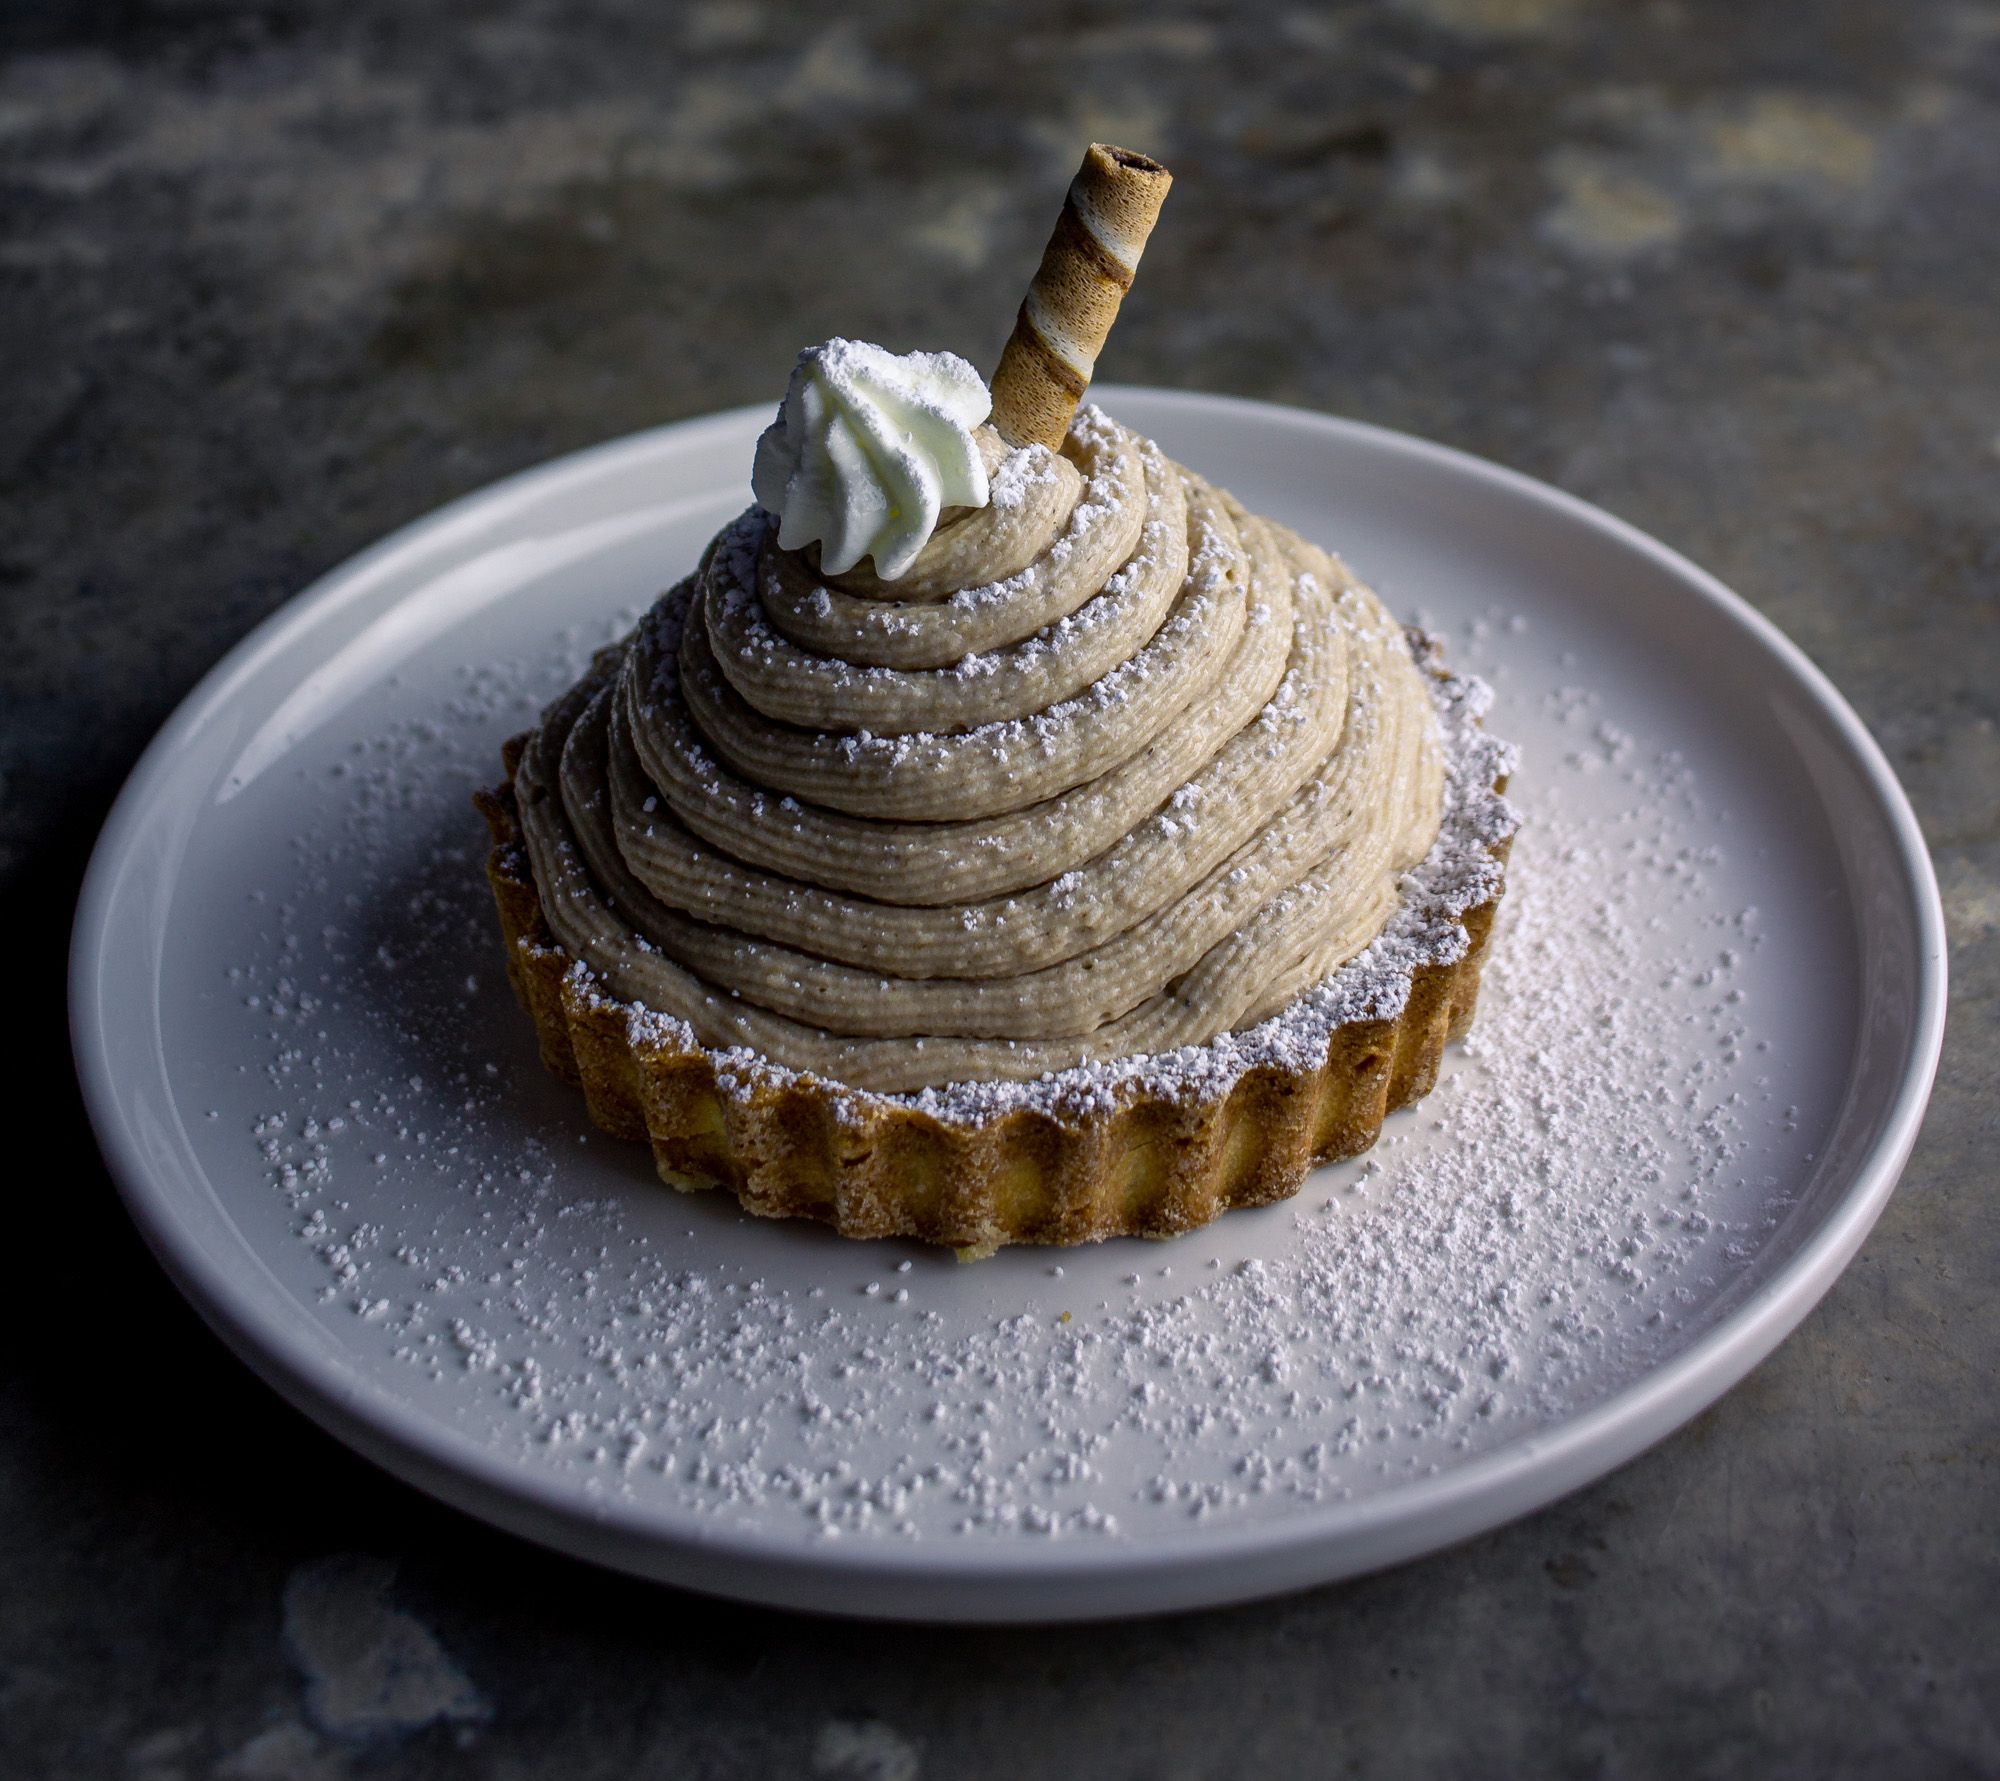
Sohm Al Tart aka Mont Blanc Tart
Final Fantasy XIV
Final Fantasy XIV
Ingredients
Makes 4, 4" tarts
Pâté Sucrée by Lietes Culinaria
Stabilized whipped cream
- 1 ½ cups heavy whipping cream
- 2 tsp sugar
- ½ tsp vanilla extract
- ½ tsp powdered gelatin
- 1 ½ Tbsp water
Chestnut cream
- 1 ½ cups chestnut puree
- ½ cup of stabilized whipped cream
Meringue
- 2 egg whites, room temperature
- ½ cup sugar
- ½ tsp vanilla extract
- ¼ tsp cream of tartar
Chocolate tuile cookies
Powdered sugar
Make the pâté sucrée, ideally the day before, and let cool completely.
To make the meringue: Preheat the oven to 200 degrees. In a stand mixer with the whisk attachment, whip the egg white while gradually adding the sugar until stiff peaks form. Transfer to a piping bag and pipe 2" peaks or “kisses” onto a parchment lined baking sheet. Bake for one hour and 30 minutes, and then set aside to cool on wire racks.
Make the stabilized cream by dissolving the gelatin in warm water. Using a hand or stand mixer, whip the cream, sugar and vanilla until it begins to thicken, then slowly add the gelatin mixture while the beaters are running. Increase the speed until soft peaks form. Divide the cream by placing all but ½ cup or so into a piping bag.
Make the chestnut cream by first whipping the sweetened chestnut puree using the stand mixture until smooth and airy. Add ½ cup of stabilized whipped cream and beat until firm peaks form, being careful not to overbeat. Transfer this mixture to a piping bag fitted with a star tip.
To assemble: place a meringue cookie in the center of each baked tart shell. Pipe a layer of whipped cream around each meringue. Pipe another layer of chestnut cream around the whipped cream. Top with an optional tuile cookie and/or piped ball of chestnut purée.
Recipe Notes
In Final Fantasy XIV, the Sohm Al Tart is described as, “A traditional Ishgardian cake made up of several stacked layers tapered to resemble Sohm Al, a peak sacred to the Dravanians. Ishgardians believe that devouring the mountain will grant them fortune in their struggle with the dragons.”
Its real-life counterpart is the Mont Blanc Tart, a French pâtisserie made primarily from chestnuts and whipped cream. The dessert is named Mont Blanc because it’s meant to resemble a snow-capped mountain. Traditionally, roasted chestnuts are pureed and piled up high by extruding thin noodle shapes, or vermicelli. In this version, I’m making a chestnut whipped cream to create a softer mountain, which is held upright with the help of a meringue “kiss” or cookie in the center.
Final Fantasy has an extensive recipe database, with most of the dishes taking inspiration from real-life foods. If you’re interested in more Final Fantasy XIV, and for a more in-depth version of the recipe above, please check out A Recipe Reborn, a video blog dedicated exclusively to Final Fantasy XIV recipes. The author’s work is incredibly impressive, and definitely worth a look if you’re a Final Fantasy fan.
References
Sohm Al Tart from Final Fantasy XIV
The Most Delicious Chestnut Dessert by Tasty